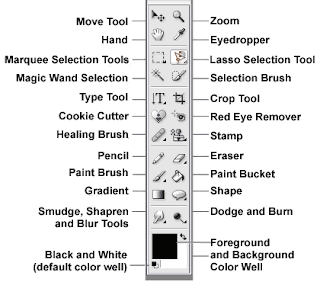
Saturday School: Tool Time
Hi Everyone! Happy Saturday! This is Jenn and I am bringing you your Saturday School today! A couple of times a month, I will be blogging about the different tools that you find in Photoshop Elements and Photoshop. I want to show you what your tools can do for you!
This week's topic for tools is the Move Tool! I know, I know... you are thinking "The Move Tool?!" I know it isn't physics, or rocket science, but we have to start somewhere, right?! The Move Tool is the most basic tool, and there are some hidden secrets! Let's see if I can show you something that you didn't know!
The Tools:

The move tool is at the top of the tools toolbar and looks like a triangle and a small arrow that points to the left. I actually learned a few tricks about the Move tool that I thought I would share! Some are basic... but keep reading! Click on the Move tool, or you can also get there by hitting "V" for the keyboard short cut and we are off...
You can move entire layers. If you first click on the layer (within the layers palette) to activate it. Then click onto the canvas and move the layer around as you would like or simply nudge it here and there using the arrow keys. A nudge is a a single pixel move in the direction of the arrow you choose. By pressing the shift key and the arrow, your nudge becomes a 10 pixel nudge!
To make copies of any image on layer, press and hold Alt key and drag the image with move tool. This action duplicates the image by creating new layer over original image layer.
To copy an object in a straight line, click and drag the object while holding down the Shift and Control (Command on a Mac) keys together. The element will be copied and the copy placed in a line either vertically or horizontally from the original element.
To find center point of any image, select move tool and check the move tool option "Show Transform Controls" on option bar above.
You can use the Move Tool temporarily while you are using most of the other tools - just by holding down the Control Key (Command on a Mac).

The option to Automatically choose the Selection is very handy. By checking this item, it allows a selection that is clicked on within the canvas to be moved. The corresponding layer in the layers palette will also be highlighted and selected.
The option to Show the bounding Box is important to me! By choosing this option, a 9 point box will show up around your selection. By choosing one of those nine points, you can click and drag to enlarge or shrink the selection. In the center of your selection is a round point, by clicking and dragging this, you can skew the selection.
When the Bounding Box is selected and you press the Control + T (Command + T on a Mac) the move tool will then change to the the Transform Command.
To quickly change the opacity of a layer quickly while you are using the move tool, type the percentage opacity you want the layer to be. Typing an 8 will change the opacity to 80%, typing 1 plus a 5 will change it to 15% but to change the opacity to 100%, you can just type a zero.
In the top of the bar that shows the Move Tools, within the sub tools, you should see this tool menu or something similar:

This part of the Move tool can be really, really useful! Aligning two layers together is all well and good, but we often find we want to align something to a specific layer. For instance, you might want to center a layer horizontally within another layer, or centering a frame on to a cropped background paper. Here's how:
- Control (or command) click on the icon in your layers palette. This makes the marching ants march around that particular selection.
- Select the layer you want to move. If you want to align more than one layer, link those layers to the selected layer:
- Here is the two step click to center:

Then click on this icon:

Presto chango.... your selection is centered on the specific layer you chose! How cool is that?!?!. Now I hope that you have learned something in the above that might be useful and you enjoyed my rambling!
Enjoy the rest of your weekend, and leave me a comment on what Tool you want to see done next! Have a great day everyone!
Jenn (jk703)


0 comments:
Post a Comment