Showing posts with label Misc.. Show all posts

Tuesday, March 8, 2011

Tidbit Tuesday - Recipe for Key Lime Pie

I'm starting to plan my menu for St. Patrick's Day next week and was trying to think of a green dessert. I remembered seeing a Key Lime Pie recipe on Oprah a couple years ago so I decided to look it up and was happy to find the recipe on her website. So in case you are starting to think of what to eat on St. Patrick's Day, I thought I would share the recipe for Mar-a-Lago Key Lime Pie with you today.
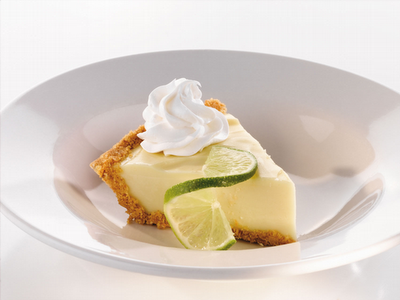
Mar-a-Lago Key Lime Pie

Servings: Serves 8

Ingredients
  • 3/4 pound graham crackers
  • 4 Tbsp. granulated sugar
  • 2 sticks melted butter
  • 1/4 tsp. sea salt
  • 4 egg yolks
  • 1 can (14 ounces) condensed milk
  • 2/3 cup fresh Key lime juice
  • 1 lime , grated zest
  • 1 cup heavy or whipping cream , chilled
  • 2 Tbsp. confectioners' sugar
  • 1/2 tsp. vanilla extract

Directions

To make graham cracker crust: Preheat the oven to 325°.

Break up the graham crackers, place in a food processor and process to crumbs. Add the melted butter, sugar and salt and pulse until combined. Press the mixture into the bottom of a 9-inch pie pan, forming an even layer on the bottom, sides and edge. Bake the crust for 10 minutes. Remove from the oven and allow the crust to cool.

To make filling: While the crust is resting, in an electric mixer with the wire whisk attachment, whip the egg yolks and lime zest at high speed until fluffy, or 5 to 6 minutes. Gradually add the condensed milk and continue to whip until thick, 3 to 4 minutes longer. Lower the mixer speed and slowly add the lime juice until incorporated.

Pour the mixture into the crust and bake for 15 minutes, or until the filling has just set. Cool on a wire rack, and then refrigerate for 20 minutes.

To make topping: Whip the cream, confectioners' sugar and vanilla until nearly stiff. Evenly spread the whipped cream on top of the pie, and place in the freezer for 20 minutes prior to serving.

Read more...

Wednesday, March 2, 2011

What We Love Wednesday - Apartment Therapy

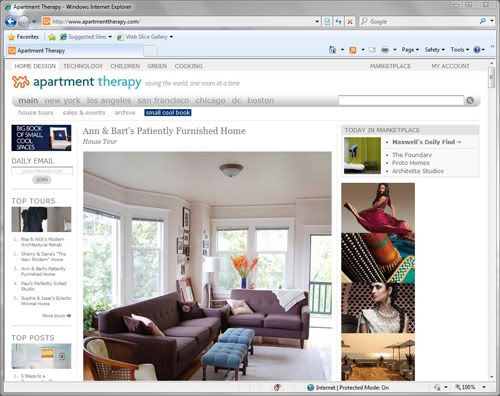
Hi everyone, Terra here to share another website that I love with you. I am constantly inspired by interior design trends and one of the websites that I am constantly referring to is Apartment Therapy. The reason that I love it is that there is truly something for everyone. There are sections on trends in home design, technology, children, green living and cooking. I dare you to visit the site and not find something you love.


I love to browse the kids' room tours - I mean how amazing is this Pirate Ship Bedroom?? They even have ideas that can be used as inspiration for hybrid projects - check out the Magnetic Play Set Tutorial. The inspiration is endless!

Read more...

Tuesday, January 4, 2011

Tidbit Tuesday - Back up your files

Terra here with a new tidbit for you. While visiting with friends and families over the holidays I heard a horror story - one of my relatives lost all of her pictures of her 3 year old son that she had taken since the day he was born. I was devastated for her. The sad thing is that a lot of people don't think about backing up their photos and other important files until something catastrophic happens. I know that I don't want that to happen to me and I don't want it to happen to any of you either. So for today's tidbit I am going to remind you of some ways to back up your files.


Make sure that you always have at least 2 copies of any irreplaceable file. Here are some of the options available to you:
  1. Burn to CD/DVD - These disks are inexpensive and often readily available and are a good choice for quick backups. However, I have heard that they have a relatively short shelf life (6-7 years) and are vulnerable to scratches etc.
  2. Save to an external drive - External drives are so much cheaper than they were in the past and I thoroughly believe that everyone should have one as part of their computer system. You can get a good 500 GB drive for under $100 (or even less if you shop around for a good deal). My external drive backs up my important files automatically and setting it up was so easy. Another option is to purchase a USB drive to specifically save important files. The only drawback is the size of USB drives. I just know that I would lose it in no time.
  3. Use an online storage service - There are so many options available when it comes to storing files online. I believe that it is important to save important files to an offsite location - in case of theft or natural disaster - and online storage is extremely secure these days. If you are interested in storing any type of file, Mozy is an inexpensive option that allows automated backups. However, if you are only interested in backing up photos, I recommend using a photo storage service like Smugmug. Note that you should never use your web host for file backup as it may violate your web hosting agreement.
These are just some options for backing up your important files. I encourage you to do some research before deciding which backup method is right for you. Don't wait until you lose your files to make backing up a habit!

Read more...

Saturday, November 27, 2010

Tips for Journaling!

Hi Everyone!  It's Jenn (jk703) again, lol!  I am here today to bring you some tips about Journaling.  Journaling is a very important aspect to our digital creations.  It tell the story, the background, and personal feelings in your pages!

Do you journal a little, a lot, or none at all?  I tend to let each layout determine what type of journaling I am going to include.  At the very minimum, I include the date and try to make a note of the people in the photos.  Do you get stuck, and wonder what to add?  Journaling prompts are a great way to add to your layouts and get you started telling more on your pages.

So... to get you to journal on your pages, I thought I'd share some questions that you could answer and create pages for.  These questions can be asked of people, or you could start an All About Me project and answer them yourself!  Here ya go:


1.  What is your favorite memory from your childhood?

2.  Who was your best childhood friend?  Where are they now?

3.  Where did you grow up?  Type of house?  City/farm, etc? 

4.  What were your teen years like?

5.  What sports did you play? or instrument?

6.  What did you think you would be when you grew up?  

7.  What were your favorite things as a teenager?  Movies, music, food, etc?

8.  Did you go to college or straight to work?  Why?

9.  How did you meet your significant other? 

10.  What are your favorite colors and why?

11.  What was your first car?  What car do you have now, and why did you choose it?

12.  Do you have any nicknames, and where did you get them?

13.  What makes you happy?  Sad?  Cry?  Angry?

14.  What good choices and bad choices have you made?

15.  What is your favorite time of the day?  Why?

16.  Where will you be in 10 years?

17.  What do you like to do in your spare time?  Hobbies? TV?

18.  What do you most like about yourself?  Dislike?

19.  Do you have any quirky or hidden talents?

20.  What are your favorite musical artists?  How did they change throughout the years?

21.  Can you cook?  Why or Why not?  Who taught you?

22.  What is in your purse right now?

23.  What is on your ipod?  applications, photos, games, movies, books?

24.  What is your favorite book? author?

25.  What is your favorite Holiday?

I hope some of these questions will get you to create pages about you and those around you!  We'd love to hear your questions/prompts that you use as well as those awesome layouts you create!  Link us up!

Have a great weekend everyone!
Jenn
(jk703)

Read more...

Tuesday, November 23, 2010

Rule of Thirds...

Huh? You say.... lol... Well, I am talking about photos and how you take them!  It is Jenn (jk703) here again with a tip for photography!  Now, I am trying to learn as I go, so I need to practice my own tips as well!  But, through my research, here is what I've found to be useful!

First, let me explain quickly what the Rule of Thirds is.  It is the basic dividing of a photo into thirds...by rows or columns.  Though, in my opinion, it is more of ninths, because there are nine quadrants!!  LOL!  A lot of times when cropping, you will see the grid, like in my picture below:


Those grid lines can change your picture so much!  Right now, I've used the crop tool to crop the photo and place the sun in the center of the picture!  Kinds of looks funny! The Rule of Thirds is a basic assumption that you should place the primary parts or focus on the grid intersections.  I've cropped my photo, and added some red dots to show you how I aligned my photo!


I actually like the way it cropped.  The boat is off to the side and my sunset with reflections looks nice to the left a bit!  It provide a well balanced, but interesting photo!  Many cameras have a grid function that you can add for your viewfinder (Dslr) or on the Point and Shoot models.  Check your reference manuals!  Here are some more examples from a trip we took to the Florida Keys! On some, you will have to imagine the quadrants, lol!


Now, remember - this is just a guideline... many times rules are meant to be broken!  Here is an example.  I loved how this picture turned out of my Dad and cousin... with the scenery.  If I moved the photo based on quadrants, it didn't look right!  


Share some of your photos... post a link!  Have fun with your photos and be sure to come back for a visit soon!

Happy Holidays!
Jenn
(jk703)

Read more...

Tuesday, November 9, 2010

Tuesday: An Extra Meals in Minutes

Hi Everyone!

Happy Tuesday to you all!  I know your pooped after a long weekend scrapping your heart out, chatting, and shopping for DSD that just passed!  I thought I would make dinner easier, by posting another fast favorite quick meal that my family loves!

Yummiest Chicken and Noodle Casserole

Ingredients:
1 can of your favorite Cream of Mushroom Soup (any: Fat Free, 98% Fat Free or any other)
1/2 cup milk (any kind)
1/4 tsp. group black pepper
1/4 cup Parmesan Cheese
1 cup frozen mixed veggies (I have used peas, carrots, and green bean mix)
2 cups cubed cooked chicken
2 cups egg noodles (or any other) cooked and drained
1/2 cup shredded Cheddar Cheese

Steps:

1. Pull a casserole dish out.  Approximately 1 1/2 to 2 qt in size.
2.  Mix into casserole dish:  Milk, Black Pepper, Parmesan Cheese, Veggies, chicken and noodles.
3.  Stir all the above ingredients together, until well mixed, and nicely coated.
4.  Bake at 400 degrees for approx. 25 minutes.  Stir again.
5.  Top with Cheddar Cheese.
6.  Place back in oven, let cheese melt for a few minutes. Remove and enjoy!


That is it!!!!  Here are some suggestions when making your dinner:

Double up the ingredients, and make two.  Save one batch for another night!
Switch out the Cheddar Cheese Topping, and put Stuffing Mix (already made).
Switch out the veggies with a different mix:  Broccoli, Cauliflower, and Carrots!
Switch out the Soup:  Cream of Chicken, and Cheddar Cheese Soup are fantastic alternatives!
Add items:  Crispy and Crunchy Onions, cubed potatoes, or bacon.

Add a side salad, and you have your dinner done!  Hope you've enjoyed this meal; I know my family does!

Have a great Tuesday!
Jenn (jk703)

Read more...

Saturday, November 6, 2010

Saturday School! Quick Tips for File Sizes

DSD has uprooted Saturday School!  So.. it is DSD -- WOOT!  I know I'm getting involved, chatting, and joining in some scrap challenges!  Jen has a fantabulous sale going on RIGHT NOW!  Here is the ad and coupon so you can go shopping!  Great deals to be had!


So with the sale in mind, I am just going to share a quick TIP for you!  Since you are going to go on over to Jen's store at the Digichick... and buy, buy, buy!  Right?!  I've got a MAJOR list of items I love that I just *need* to have!  My hard drive is ok for now, but what happens if you are needed some space for your goodies?  Here is an EASY way to trim the file sizes for your layouts!


Dragging and dropping oodles of papers and elements on your layout is how we make our layouts.  What you don't realize is that when an items is placed in your layout, many times there are parts of these layers hanging off your pages!  When you use a piece of paper at an angle and the paper only covers half of that 12 x 12 layout your working on...so where is that other half?  It is still there, just invisible to YOU!  It is not invisible to your computer or files though!!!  That part of the paper that you can't see is taking up that valuable space on your hard drive!  That is space that you could be filling up with more JFD and DSD Goodies!!!!  So, let's get to it and clean up the files!

When you are done with a page, here is what you should do before you press the save button!  In the Menubar, click on Select.  When you click, a drop down menu will appear.  Choose All from that drop down menu.  You should see the marching ants happily marching around your square 12 x 12 edge.  

MOST IMPORTANT....  Next, you will go back to the Menubar, and choose Image, and then click on Crop.  This quick and easy step allows you to trim away all that unseen, space hogging digital items on your layouts that you cannot see!

By completing this step, you can really reduce your file size.  Reducing some of my earlier layout files have seen over a 10MB reduction!  Just think... 10MB x 10 layouts!  that is almost 1 GB... keep adding that up and you have lots of space to fill with Jen's stash!

Ok.. off you go... clean up that memory, and have fun filling it up with new goodies!
Have a great DSD, and weekend!
Jenn (jk703)

Read more...

Wednesday, November 3, 2010

A New Look...

Hi everyone!!! You'll notice over the next few days that the blog is getting a bit of a makeover. See, Laura Banasiak of Little Boxes Boutique made me gorgeous new blinkies and a banner and I figured that the blog should match! Check out what she made for me:


This is the fan blinkie...really, you should snag it and wear it proudly around digiland. You never know what kind of good things could happen if one of my CT girlies or I spot you wearing it!


So, just pardon the mismatched look for the next couple of days until I can make it all matchy-mathcy. In the meantime, keep an eye out for some amazing DSD saving from me...and remember, until then, The Digichick is kicking things off early! Starting now through Nov. 7th, save 30% off store-wide AND pick up a beautiful new collab kit free with any purchase of $15 or more! You just might find a surprise inside--including something from me!!! Enjoy the savings and happy shopping!

Read more...

Tuesday, October 26, 2010

Tidbit Tuesday: Removing a Background

Hi Everyone!  It's Jenn (jk703) here with your tidbit for Tuesday!  I was here on Saturday and shared a little information on the Lasso Tool, and it's friends:  Polygonal Lasso and Magnetic Lasso.  I'm here today to share how to do a quick removal of a photo's background!  So bear with me and all the red that you will see shortly!  I sure should remember to change the mask color in Photoshop soon!  Goodness...

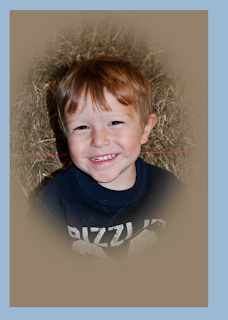
Anyway... Here is where we start! First, open the photo that you want to remove the background on.  Here is mine of my little boy, Colin!


Once you choose the Magnetic Tool, you should start clicking around the image that you want to stay, and the background behind will be removed. For my example, I am clicking around Colin's body, and moving around his clothes.  (Sorry, my screen capture below also captured me getting my selection, so I have a few extra magnetic tool squares, lol!):


Once you have clicked all the way around, you will get those fabulous marching ants... now -- who would have thought ants could be fantastic!  Once you are at this point, this is what you should see:


You can see though, in the image above, Colin's treasured stick was not fully captured.  So... if you press Q on your keyboard you will be brought into mask mode.  This allows you to easily make changes to the image and what is or isn't included within your marching ants.  Painting with white removes the ruby red mask, and painting in black adds ruby red to the mask. I need to remove the mask on the stick, so I am painting with white.  


Here is my full mask after I zoomed in and re-captured the stick in his hand. Looks funny right... I know... lol!  Now when you do this, you can go around to all the edges and be as specific as you like.


After you have completed mask edit, you can soften the edges by adding a slight Gaussian Blur to the image.  Still in the mask mode, click on Filter > Blur > Gaussian Blur.  Bring the blur down to .5 pixels just to soften the edges.  It is up to you how much you want to use, so play around until you find what you like!


Click ok, and the blur is set.  Next press Q to quickly get out of the Mask Mode.  You will see your image with the marching ants again.  Making sure your photo is selected, all you have to do is hit delete on your keyboard and the background will be removed to the clear pixel view.  Now, just add papers, put your image in a layout or you could blend it into the paper... so many ideas!  Here is Colin, removed from the woods!


Hope you enjoyed a quick way to remove a background from a photo!  You never know what you might catch behind your subject, it might be good to know how to remove it!  LOL!
Have a great Tuesday everyone!  Til next month!

Jenn
(jk703)

Read more...

Saturday, October 23, 2010

Saturday School: Tool Time - Lasso Tool

Hello, Hello!  Happy Saturday!  It's Jenn (jk703) here with a quick post about the Lasso Tool!  Just a few pointers and tips about that cool tool!  Here goes!

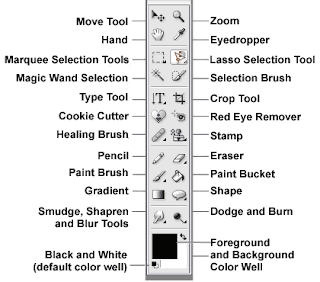
First, the Lasso Tool looks like this:


The first tool is the Lasso Tool and allows you to draw free form selections.
The second is the Polygonal Lasso Tool and this one allows you to draw selections, but they will consist of line segments.
The third is the Magnetic Lasso Tool and allows you to make selections based on the edges; almost as if you are tracing the edges.

The same selection tools available for the Marquee Tool are available for the Lasso Tools.  This allows you to add, subtract and change your selections.


One great tip for me helps with lines.. To Create straight lines hold down the ALT/OPT key as you draw the path. What this does is -- it toggles between the standard tool and the Polygonal Tool. Presto - straight line!  Woot!

What can the Lasso tools do for you?  Here are two easy things it may help out with:

Creating your own custom Shape:  
Create a new transparent layer by clicking the Create a New Layer icon in the Layers Panel, then you can click on the Polygonal Lasso tool. 

In the Menu Bar, set the Feather to 0 and choose the New Selection icon in the Options bar. (A Feather at 0 is a basic hard edge, while the higher the number, the softer the edge will be).

Click four times (or however many you need for your shape) on your new document to create the four corners of your shape and then double-click to close the shape.

Next, you will choose the Paint Bucket tool and click inside your shape to fill it with the foreground color.  Press Enter. 

Here is the Feather at 0, with the marching ants, and then filled with the Paint Bucket:


Here is the Feather at 5, with the marching ants, and then filled with the Pain Bucket.  As you can see... it really takes the hard edges off with just a little higher feather!  Play with the settings and find your perfect number! 


Press Ctrl D (Cmd D) to remove the selection.

You can use your new shape to clip papers or photos, or make and edge template!  

Many times you will get Alphas or even embellishments for kits on a single sheet.  This sometimes helps to see everything.  How do you move things from that sheet to your page... Here's how:

Alpha Full Pages:  Moving Single Letters

First, you need to open  the png Alpha file.
Select your Lasso tool (or your Marquee Tool -- whichever you prefer).
Click and draw your lasso around the letter you want to use in your layout.
Once selected, you should see the marching ants around it (meaning it is the active selection).
Choose the Move Tool and drag the letter onto your layout. It will be added on its own layer.
Repeat the steps for additional letters.


One Tip when moving letters... as with any moving in Photoshop:
If you want your letters to be centered on your layout, hold down the Shift key as you drag it from the png file to your layout. 


Hope you enjoyed my bits about the Lasso Tool!  On Tuesday, I will be sharing how to use the Lasso tool and removing a background from a photo!  Hope you come back to read it!

Have a great weekend!
Jenn
jk703


Read more...

Tuesday, October 12, 2010

Tidbit Tuesday.... Creating a Vignette


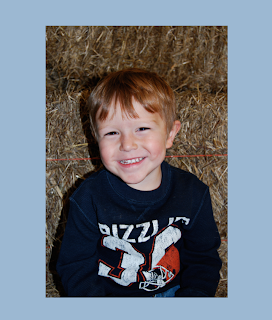
Hi Everyone! Jenn (jk703) here with a Tidbit for Tuesday! My tidbit carries over from Saturday School: Tool Time. I had focused on the Marquee Tool, and promised to show you how to create a Vignette, PLUS save the Vignette for future use in your scrapbooking projects! Here we go:

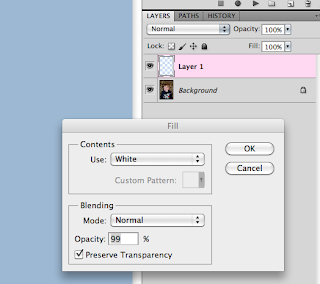
First, open a photo that you would like to work with. Then you will now create a new layer above your photo. Next, I chose the new layer, then chose the color I wanted the vignette to be. For this example, I chose white.


I clicked on my paint bucket, and filled in my new layer white. You can pick whatever color you want, by using the eyedropper tool, and moving and adjusting what color spectrum you want to use. You can also pick a color from the photo itself.

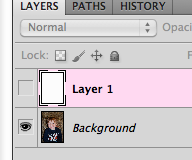
After my layer is white, I turn off the visibility of the white layer, my to-be-Vignetted layer!
You should now be looking at your picture again, and your Layers Palette will look like this:


On the toolbar, choose the Elliptical Marquee Tool:


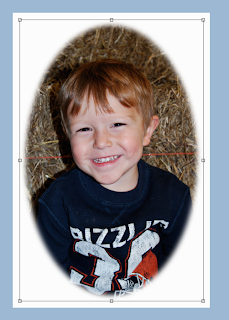
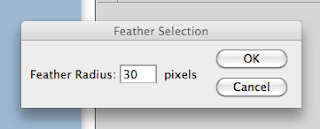
Now, Click in the Top left of your picture and drag to the opposite corner of your picture. You should have an oval of moving ants on your picture. Once you have this, you can nudge and move the oval around to where you would like to Vignette to be placed on your photo. Under the Select Meanu Heading, choose Modify and then choose Feather. You will start with a feather of 30 pixels. You can play around with this number, depending on how much of a vignette you would like.

Now with your To-Be-Vignetted Layer selected, all you have to do is click on Delete. It should remove the selection inside the oval that you created. Your oval should show off the portion of the photo you wanted in the Vignette. Here is mine:


How easy was that?! You can change the shape, the opacity, add a pattern, whatever you want... try using a paper! Here is one with a tan color, and 170 feathering.


One last item... Say you spent a lot of time on your vignette, used different opacity levels, colors, and more... and you want to use it on another photo... You can save it for future use! Just turn off all the layers except the Vignette Layer in the Layers Palette, and Save As. Remember to save as a .png, and where you saved the file to!

Thanks for visiting and have a great Tuesday!
Jenn (jk703)


Read more...

Saturday, September 25, 2010

Saturday School: Tool Time

Hi Everyone! Happy Saturday! This is Jenn and I am bringing you your Saturday School today! A couple of times a month, I will be blogging about the different tools that you find in Photoshop Elements and Photoshop. I want to show you what your tools can do for you!

This week's topic for tools is the Move Tool! I know, I know... you are thinking "The Move Tool?!" I know it isn't physics, or rocket science, but we have to start somewhere, right?! The Move Tool is the most basic tool, and there are some hidden secrets! Let's see if I can show you something that you didn't know!

The Tools:


The move tool is at the top of the tools toolbar and looks like a triangle and a small arrow that points to the left. I actually learned a few tricks about the Move tool that I thought I would share! Some are basic... but keep reading! Click on the Move tool, or you can also get there by hitting "V" for the keyboard short cut and we are off...

You can move entire layers. If you first click on the layer (within the layers palette) to activate it. Then click onto the canvas and move the layer around as you would like or simply nudge it here and there using the arrow keys. A nudge is a a single pixel move in the direction of the arrow you choose. By pressing the shift key and the arrow, your nudge becomes a 10 pixel nudge!

To make copies of any image on layer, press and hold Alt key and drag the image with move tool. This action duplicates the image by creating new layer over original image layer.

To copy an object in a straight line, click and drag the object while holding down the Shift and Control (Command on a Mac) keys together. The element will be copied and the copy placed in a line either vertically or horizontally from the original element.

To find center point of any image, select move tool and check the move tool option "Show Transform Controls" on option bar above.

You can use the Move Tool temporarily while you are using most of the other tools - just by holding down the Control Key (Command on a Mac).


The option to Automatically choose the Selection is very handy. By checking this item, it allows a selection that is clicked on within the canvas to be moved. The corresponding layer in the layers palette will also be highlighted and selected.


The option to Show the bounding Box is important to me! By choosing this option, a 9 point box will show up around your selection. By choosing one of those nine points, you can click and drag to enlarge or shrink the selection. In the center of your selection is a round point, by clicking and dragging this, you can skew the selection.

When the Bounding Box is selected and you press the Control + T (Command + T on a Mac) the move tool will then change to the the Transform Command.

To quickly change the opacity of a layer quickly while you are using the move tool, type the percentage opacity you want the layer to be. Typing an 8 will change the opacity to 80%, typing 1 plus a 5 will change it to 15% but to change the opacity to 100%, you can just type a zero.

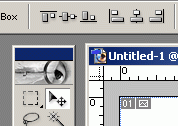
In the top of the bar that shows the Move Tools, within the sub tools, you should see this tool menu or something similar:
This part of the Move tool can be really, really useful! Aligning two layers together is all well and good, but we often find we want to align something to a specific layer. For instance, you might want to center a layer horizontally within another layer, or centering a frame on to a cropped background paper. Here's how:
  1. Control (or command) click on the icon in your layers palette. This makes the marching ants march around that particular selection.
  2. Select the layer you want to move. If you want to align more than one layer, link those layers to the selected layer:
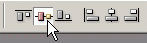
  3. Here is the two step click to center:
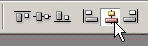
Click on this icon:
Then click on this icon:
Presto chango.... your selection is centered on the specific layer you chose! How cool is that?!?!. Now I hope that you have learned something in the above that might be useful and you enjoyed my rambling!

Enjoy the rest of your weekend, and leave me a comment on what Tool you want to see done next! Have a great day everyone!
Jenn (jk703)


Read more...

Sunday, September 19, 2010

Crock Pot Lasagna!!! Yum and Quick!


Hi Everyone! I'm Jenn (jk703) and I have a great meal to share with you for Meals in Minutes Monday! Woot! First, I do have to apologize; I don't have any pictures! I took the pictures, but accidentally deleted them off my camera! I did include a picture of a crock pot lasagna that I found at least! Next time I will have my own personal scrumptious pictures for you to drool over!


OK.... Here is the recipe!

Slow Cooker Crock Pot Lasagna Ingredients:
1 32oz jar of your favorite Marinara Sauce
2 tsp. McCormick Italian Seasonings (or your favorite Italian Seasonings Brand)
1/4 cup Minced Onions
1 15 oz container of Part Skim Ricotta Cheese
1 cup of Parmesean Cheese, Shredded
3 cups of Mozzarella Cheese, Shredded
12 Lasagna Noodles, uncooked and No Boil Kind.
1 1/2 pounds cooked Fresh Chicken Sausage, or your favorite meat (this can be excluded also)

Combine sausage, sauce, and seasonings in a big bowl.
Combine ricotta, parmesean, and 2 cups of the mozzarella cheese in another bowl.
Cover crock pot bottom and edges with a non-stick cooking spray or with a crock pot liner.
Cover bottom of crock pot with about 1/4 cup of sauce.
Layer the lasagna noodles to cover the bottom. Break up the pieces to cover more areas.
Top the noodles with the cheese mixture.
Top the cheese mixture with some sauce to cover it.
Continue in alternating layers -- sauce, noodles, cheese, sauce, noodles, cheese.
Cover the crock pot and cook for 6-8 hours on Low setting or 3-4 hours on High setting. Sprinkle with additional mozzarella cheese before serving.
To make this faster, I make the whole thing the evening before, and then put my whole crock pot insert into the fridge! I pop it into the crock pot, and plug it in... and off I go to work! How easy is this!!!!

Hope you like the recipe and let me know if you tried it!
Have a great Monday!!!!

Jenn

Read more...

Tuesday, September 7, 2010

Yummy Tidbits!


Hi Everyone! My name is Jenn (jk703) and I'm bringing you a few of my favorite Tidbits for Tidbit Tuesday! Woo Hoo! I know everyone likes the meals that we showcase on Monday's Meals in Minutes... but what about the desserts, and yummies for after those meals? I thought I would share some info for some fun desserts!

First, is the fantastic and popular: Bakerella! This site is full of ideas... cakes, pops, and great ideas! Boy, I wish I had an ounce of her talent! Here are a few pics from her blog:

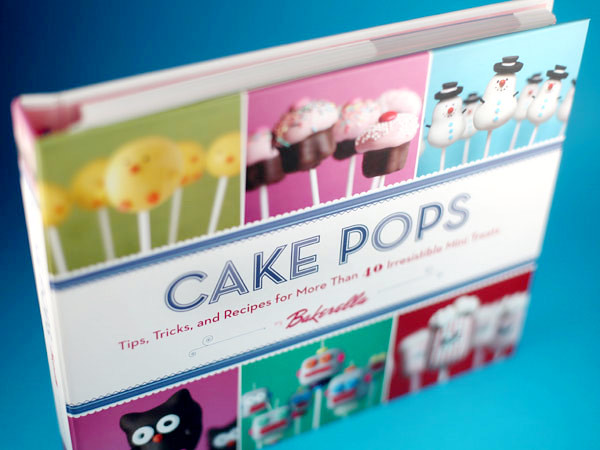
Her new book coming out soon (which I want to get!):

and some here are her so pretty to eat, but I would eat them! Cake Bites (her Cake Pops look just like these, but on a stick, various kinds):
YUM, right?!


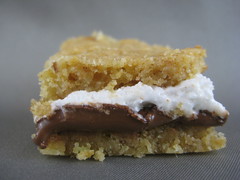
A great resource for recipes and yummy desserts is Nosh With Me: Easy to follow recipes, pictures and ideas! Great Blog! Here is a pic of her S'mores recipe that looks perfect without the fire!


As the ending... my all-time favorite is : Hello, Cupcake! This is a website, as well as a blog that showcases what you can make with cupcakes, icing, and candy! Check it out! I made a few of the recipes from their first book named: Hello, Cupcake! (lol):


They have a second book that is out now, called "What's New, Cupcake?" I will have to head out and check that one out for some great new ideas!!! Check these out -- Spagetti and Meatballs!! Hello, Cupcake! Style...
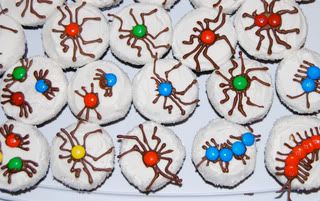
Here are pics from my own creations using their book... so you know they CAN be done! Some (Fun to Make) Bugs:

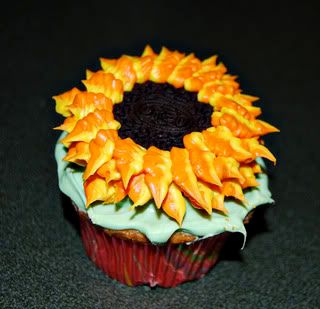
One of the (Really Pretty in Person) Sunflowers:
Here is one of MY favorites... just cause I created it! lol! My very Own Cookie Monster Look A Like:


Well, I hope you've enjoyed these blogs, photos, and tidbits! I am pretty sure that I might be leaving you hungry! Would love to see your edible creations, so share any that you've made in the comments!!! Have a great day!

Jenn (jk703)

Read more...

Tuesday, July 7, 2009

One of MY favorite designers is having a sale!

Normally I only use my blog to show you all my sales and news, but today I want to share a fabulous sale by one of my fave designers out there :

Rush on over to her store tomorrow and enjoy these amazing savings!!! ♥ Happy Birthday, Penny!


Read more...

Monday, June 1, 2009

Wanna Win an EHD???

Check this out!!!


Read more...

Thursday, April 16, 2009

Welcome!!!

Welcome to my new design blog!!! I've recently dipped my hand in designing and hope to use this blog to share some of my creations. Please check back often for new goodies and updates! ♥

Read more...
Related Posts with Thumbnails

Disclaimer

As a creative team member for several digital scrapbook designers, I have received their products for free in return for creating and posting projects (digital layouts, hybrids projects, etc). Many of the layouts you see here were done in conjunction with requirements for these creative teams. Please be advised that the products used were indeed received for free.
The Daily Scrapper - Topsites Best Scrapbooking Sites, Digital Scrapbooking, Scrapbook Supplies, Reviews, Awards
List of the Best Digital Scrapbooking Websites by Scrapbook MAX!SCRAPBOOKING TOP 500 The Daily Scrapper - Topsites Free Digital Scrapbooking

  © Blogger templates Newspaper III by Ourblogtemplates.com 2008

Back to TOP