Showing posts with label Organization. Show all posts

Saturday, March 26, 2011

Saturday School: Option to Edit & Organize - Photo Software

Hi Everyone!  It's Jenn (jk703) here to share some information with you today for saturday School!  We are going to go over some software options that are available for photo editing and organization!

I know... you are looking at your scrapbooking stash and wondering if there is something out there to help you find things, sort images, and edit images, making it all pretty and tidy, right?! I bet you even started digital scrapbooking, and thought "This is going to be so much more organized than paper scrapping!"  Right!?!  HA!  Now, you've probably been scrapping for a bit, have a gigantic un-countable amount of un-edited photos and then on top of that an amazing stash of digi supplies!

What to do? What to do?  Well.... I'm going to share some software that either is for photo organization, photo editing or has the capabilities included. Depending on your type of computer, budget and what options you are looking for - there is something for everyone!

 Picasa is by Google.  It is a free download that will allow you a simple way to organize your photos.  This option also allows for simple photo editing, such as lighting and color issues. They offer batch uploading, and also allows you to see the photo properties.  You can see what settings you had on the camera when you took a certain photo. They support tagging, search filters, and color searches.


Adobe Photoshop Elements is not just for creating, but can be used for the organization of your photos and supplies. This is available on all Windows versions of PSE, and then only on
PSE 9 for Mac versions. The organizer lets you organize your photos with keyword tags, then search and share them.  Quick fix allows you to crop, fix red eye, and sharpen  - but there is much more.  Cost can be from $50 to $100.
Adobe Bridge comes with the certain Adobe programs or Creative Suites.  It offers a folder based system of organization.  This software would streamline your photo editing, creative workflow, and actually using your photos because it works directly with Photoshop.  Allows sorting, filters, batching, color labels, star ratings, and some drag and drop features.  Cost:  Software comes with certain Adobe software, so the price can vary. 
Acdsee is an easy to use photo organizer, editor, and sharing machine.  Browse, organize, and manage all your photos and supplies in one location.  Create your own categories, keywords, key phrases, and much more.  There are also editing tools included, such as exposure correction, red eye fix, and it also includes some creative effects. Cost:  $70 - $170.00 depending on the version. 


Adobe Photoshop Lightroom is more of a photo editing software than an organizer.  It isn't a file browser like Adobe Bridge, but more of an image management system with heavy duty photo editing. The organization part of Lightroom reminds me of the Photoshop Elements Organizer.  You can use keywords, and locate things by color, or type.  Cost:  $250-$300. 

iPhoto is a software that is included in iLife, on Apple computers. This just happens to be how I ended up organizing.  The software allows for events, merging, separation as well as keywords, smart albums and search functions.  You can create separate photo libraries, such as one for photos and one for digital scrap supplies.  This software has really basic photo editing options.  Cost:  $49 - $79, to purchase iLife software.

Have a great Saturday everyone!
Jenn (jk703/TheTypativeScrapper)

Read more...

Tuesday, January 4, 2011

Tidbit Tuesday - Back up your files

Terra here with a new tidbit for you. While visiting with friends and families over the holidays I heard a horror story - one of my relatives lost all of her pictures of her 3 year old son that she had taken since the day he was born. I was devastated for her. The sad thing is that a lot of people don't think about backing up their photos and other important files until something catastrophic happens. I know that I don't want that to happen to me and I don't want it to happen to any of you either. So for today's tidbit I am going to remind you of some ways to back up your files.


Make sure that you always have at least 2 copies of any irreplaceable file. Here are some of the options available to you:
  1. Burn to CD/DVD - These disks are inexpensive and often readily available and are a good choice for quick backups. However, I have heard that they have a relatively short shelf life (6-7 years) and are vulnerable to scratches etc.
  2. Save to an external drive - External drives are so much cheaper than they were in the past and I thoroughly believe that everyone should have one as part of their computer system. You can get a good 500 GB drive for under $100 (or even less if you shop around for a good deal). My external drive backs up my important files automatically and setting it up was so easy. Another option is to purchase a USB drive to specifically save important files. The only drawback is the size of USB drives. I just know that I would lose it in no time.
  3. Use an online storage service - There are so many options available when it comes to storing files online. I believe that it is important to save important files to an offsite location - in case of theft or natural disaster - and online storage is extremely secure these days. If you are interested in storing any type of file, Mozy is an inexpensive option that allows automated backups. However, if you are only interested in backing up photos, I recommend using a photo storage service like Smugmug. Note that you should never use your web host for file backup as it may violate your web hosting agreement.
These are just some options for backing up your important files. I encourage you to do some research before deciding which backup method is right for you. Don't wait until you lose your files to make backing up a habit!

Read more...

Tuesday, December 21, 2010

Tidbit Tuesday - Plan your Christmas photos

Hi everyone, Terra here with another Tuesday Tidbit for you. With all of the hustle and bustle during Christmas it is easy to forget to take photos of some of the things you want to remember. So this year, I am hoping that some advance planning will help me out. I have started a list of "must have" photos as this is my first Christmas with my little boy. I know that I am most interested in the spontaneous, unplanned photos, but if I don't make a list of the photos I want, I am sure to forget to capture some special moments. These are some of the pictures I want to have to look back on (and scrap) after the holidays are over. Hopefully this list will inspire you to make a list of your own and help you think of some of the moments you want to capture.

Equipment Preparation
  • Extra batteries
  • Clear memory card
  • Review camera manual
  • Clean camera and lens

Must Have Photos
  • Tree decorated with lights on. Take just before dark without flash.
  • Baby's First Christmas ornament, Charlie Brown ornament and Peter Pan ornament
  • Gifts under the tree
  • Kids opening gifts
  • Kids with their Christmas outfits on
  • Kids playing with wrapping paper, bows, etc.
  • Baking cookies
  • Mom preparing Christmas dinner
  • Christmas Eve games
  • Kids and Grandpa writing letter to Santa
  • Treats for Santa and reindeer
  • Christmas dinner
  • Carving the turkey
  • Christmas lights
  • Kids playing outside at night
  • Bedtime stories
  • Kids asleep on Christmas Eve
  • Kids walking to Christmas tree when they first wake up
  • Opening stockings
  • Opening gifts on Christmas morning
  • Kids with Grandma and Grandpa
  • Kids with Aunt and Uncle
  • Family portrait

Let me know if I've missed anything in the comments!


Read more...

Saturday, November 6, 2010

Saturday School! Quick Tips for File Sizes

DSD has uprooted Saturday School!  So.. it is DSD -- WOOT!  I know I'm getting involved, chatting, and joining in some scrap challenges!  Jen has a fantabulous sale going on RIGHT NOW!  Here is the ad and coupon so you can go shopping!  Great deals to be had!


So with the sale in mind, I am just going to share a quick TIP for you!  Since you are going to go on over to Jen's store at the Digichick... and buy, buy, buy!  Right?!  I've got a MAJOR list of items I love that I just *need* to have!  My hard drive is ok for now, but what happens if you are needed some space for your goodies?  Here is an EASY way to trim the file sizes for your layouts!


Dragging and dropping oodles of papers and elements on your layout is how we make our layouts.  What you don't realize is that when an items is placed in your layout, many times there are parts of these layers hanging off your pages!  When you use a piece of paper at an angle and the paper only covers half of that 12 x 12 layout your working on...so where is that other half?  It is still there, just invisible to YOU!  It is not invisible to your computer or files though!!!  That part of the paper that you can't see is taking up that valuable space on your hard drive!  That is space that you could be filling up with more JFD and DSD Goodies!!!!  So, let's get to it and clean up the files!

When you are done with a page, here is what you should do before you press the save button!  In the Menubar, click on Select.  When you click, a drop down menu will appear.  Choose All from that drop down menu.  You should see the marching ants happily marching around your square 12 x 12 edge.  

MOST IMPORTANT....  Next, you will go back to the Menubar, and choose Image, and then click on Crop.  This quick and easy step allows you to trim away all that unseen, space hogging digital items on your layouts that you cannot see!

By completing this step, you can really reduce your file size.  Reducing some of my earlier layout files have seen over a 10MB reduction!  Just think... 10MB x 10 layouts!  that is almost 1 GB... keep adding that up and you have lots of space to fill with Jen's stash!

Ok.. off you go... clean up that memory, and have fun filling it up with new goodies!
Have a great DSD, and weekend!
Jenn (jk703)

Read more...

Saturday, September 25, 2010

Saturday School: Tool Time

Hi Everyone! Happy Saturday! This is Jenn and I am bringing you your Saturday School today! A couple of times a month, I will be blogging about the different tools that you find in Photoshop Elements and Photoshop. I want to show you what your tools can do for you!

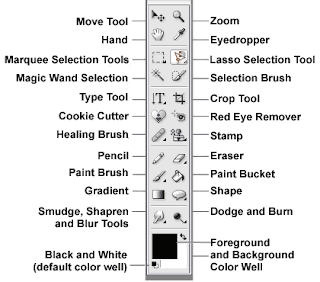
This week's topic for tools is the Move Tool! I know, I know... you are thinking "The Move Tool?!" I know it isn't physics, or rocket science, but we have to start somewhere, right?! The Move Tool is the most basic tool, and there are some hidden secrets! Let's see if I can show you something that you didn't know!

The Tools:


The move tool is at the top of the tools toolbar and looks like a triangle and a small arrow that points to the left. I actually learned a few tricks about the Move tool that I thought I would share! Some are basic... but keep reading! Click on the Move tool, or you can also get there by hitting "V" for the keyboard short cut and we are off...

You can move entire layers. If you first click on the layer (within the layers palette) to activate it. Then click onto the canvas and move the layer around as you would like or simply nudge it here and there using the arrow keys. A nudge is a a single pixel move in the direction of the arrow you choose. By pressing the shift key and the arrow, your nudge becomes a 10 pixel nudge!

To make copies of any image on layer, press and hold Alt key and drag the image with move tool. This action duplicates the image by creating new layer over original image layer.

To copy an object in a straight line, click and drag the object while holding down the Shift and Control (Command on a Mac) keys together. The element will be copied and the copy placed in a line either vertically or horizontally from the original element.

To find center point of any image, select move tool and check the move tool option "Show Transform Controls" on option bar above.

You can use the Move Tool temporarily while you are using most of the other tools - just by holding down the Control Key (Command on a Mac).


The option to Automatically choose the Selection is very handy. By checking this item, it allows a selection that is clicked on within the canvas to be moved. The corresponding layer in the layers palette will also be highlighted and selected.


The option to Show the bounding Box is important to me! By choosing this option, a 9 point box will show up around your selection. By choosing one of those nine points, you can click and drag to enlarge or shrink the selection. In the center of your selection is a round point, by clicking and dragging this, you can skew the selection.

When the Bounding Box is selected and you press the Control + T (Command + T on a Mac) the move tool will then change to the the Transform Command.

To quickly change the opacity of a layer quickly while you are using the move tool, type the percentage opacity you want the layer to be. Typing an 8 will change the opacity to 80%, typing 1 plus a 5 will change it to 15% but to change the opacity to 100%, you can just type a zero.

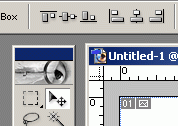
In the top of the bar that shows the Move Tools, within the sub tools, you should see this tool menu or something similar:
This part of the Move tool can be really, really useful! Aligning two layers together is all well and good, but we often find we want to align something to a specific layer. For instance, you might want to center a layer horizontally within another layer, or centering a frame on to a cropped background paper. Here's how:
  1. Control (or command) click on the icon in your layers palette. This makes the marching ants march around that particular selection.
  2. Select the layer you want to move. If you want to align more than one layer, link those layers to the selected layer:
  3. Here is the two step click to center:
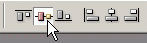
Click on this icon:
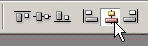
Then click on this icon:
Presto chango.... your selection is centered on the specific layer you chose! How cool is that?!?!. Now I hope that you have learned something in the above that might be useful and you enjoyed my rambling!

Enjoy the rest of your weekend, and leave me a comment on what Tool you want to see done next! Have a great day everyone!
Jenn (jk703)


Read more...

Thursday, May 6, 2010

Tidbit Thursday - Get Organized!

Morning everyone!  So by now I'm hoping you followed my advice on Google Reader (see this post) to make your life a little simpler when it comes to blog reading.  Now I'm going to try and Organize you!  One of the best tools I've found to try and stay organized is Google Calendar.  No, I don't work for Google, I just like having everything in one spot.  I am pretty much always near a computer, and I like the web-based calendar because I can also access it when I don't have my own laptop.

After you log in to Google, click on the Calendar link at the top.   It'll look like this:


You can customize it by Day, Week, Month, etc. across the top.  Down the right side are your tasks - both completed and not (until you clear them).

To add a new Event, just click either on the time you want to schedule the event, or at the top in the box under the date.  This will pop up:


If it's a simple event, just type it in and away you go.  If it's more detailed or recurring, click on 'edit event details' and this box will pop up:


You can set things to recur annually, weekly, monthly, etc.  It's a great way to remember birthdays (and if you see by my Calendar, it was my dad's birthday yesterday).  Click OK on the bottom (not shown on my screenshot) and it'll set up your event!

You can also use Google Calendar for tasks - and I have to tell you this has organized me so much!   I even use Google Calendar for my scrapbooking! No joke! I am on a few CT's and it can get confusing which day to upload new layouts, so as soon as I'm done a page with a kit that's not released yet, I put a task in my Calendar on the day I need to upload it so I don't forget.  I have a good memory, but it's short, so I also sometimes put chores or even grocery lists on there as I remember them.  To add a task, click in the box under the date and click on 'task'.


For my layout purposes, I just put the title of the layout as the task, and the credits in the notes field - so it's all there and handy when I go to post the layout on the day I should.  I also put tasks there when I need to download a kit I purchased so I don't forget (if I don't do it right away).


See, it's even telling me I have to do a blog post for Jennifer Fox today.  Guess I can check that one off now!

So there's a review of a handy little tool to keep you organized!  Don't forget that Jennifer still has her grab bags for sale in her shop - grab them before it's too late!

Read more...

Related Posts with Thumbnails

Disclaimer

As a creative team member for several digital scrapbook designers, I have received their products for free in return for creating and posting projects (digital layouts, hybrids projects, etc). Many of the layouts you see here were done in conjunction with requirements for these creative teams. Please be advised that the products used were indeed received for free.
The Daily Scrapper - Topsites Best Scrapbooking Sites, Digital Scrapbooking, Scrapbook Supplies, Reviews, Awards
List of the Best Digital Scrapbooking Websites by Scrapbook MAX!SCRAPBOOKING TOP 500 The Daily Scrapper - Topsites Free Digital Scrapbooking

  © Blogger templates Newspaper III by Ourblogtemplates.com 2008

Back to TOP