


Wednesday, March 31, 2010

Want a Sneak Peek?!?
Hi everyone! Sally here again to bring you a Sneak Peek of Jennifer's awesome new release. It's full of fun bright stuff perfect for scrapping birthday parties or fun everyday pages!
Come back tomorrow for the full kit reveal, and don't forget it will be on sale at the DigiChick tomorrow only!
So you want to do hybrid...
Hi everyone! Sally here to talk about hybrid stuff! Ok! So you've decided you want to jump into the hybrid game. Now what? What do you need to get started? What I've done for today is compile my top list of things you need for hybrid. Now, having said that, let me remind you that you CAN do hybrid with nothing more than a color printer, a pair of scissors, and some glue. This list is a bit more comprehensive, and the further you go down the list, the less "must have" the items become. Ok, so here we go!
The first thing you need is card stock or matte photo paper. I use Canon MP-101 for matte paper, and just whatever card stock I can find at Wal Mart or Office Depot that's on sale. I didn't photograph the card stock, because mine is out of the package and stored in a drawer, and who wants a photo of plain white card stock? Like I said, any cardstock is fine.
The next thing you need is a self healing cutting mat. These are available at most craft stores such as Michael's or Hobby Lobby. You can sometimes find them in Wal Mart in the quilting section. I don't have a photo of one of these, and the reason why? Well, because I don't have one. The closest Michael's and Hobby Lobby to me are an hour away, and I haven't made the trip yet. Our Wal Mart didn't have a self healing mat, so I'm currently using one that doesn't heal, and it's really cut to bits. So, that being said, you don't HAVE to have one, you can use a piece of cardboard or anything really, just make sure you protect your desk/table/etc.
Now you need something to cut and score with. I use an X-Acto knife for 80% of my cutting. I love that I can make precise cuts with it, and I have more control than with scissors. You can find X-Acto knives in most tool kits. They also carry them at Wal Mart in the hardware department. I found this cute hot pink one in the scrapbooking section there. They can also be purchased at most any craft store. You will also need a scoring tool. Notice the butter knife in the picture below? I'm too cheap to buy a scoring tool, so I just use the back of the knife to score my projects. Scoring tools can be found at any scrapbooking or craft store.
Now you really do need a good pair of scissors. Sometimes a project does call for scissors, and until you have experience with using the exacto knife, cutting curved lines can sometimes be easier with scissors. You'll also need a ruler. They're great for helping cut straight lines, and I use them to make sure my score lines are nice and straight. I line the ruler up with the line I want to score, then run my butter knife along the edge of the ruler.
Up next....glue. Now you can do hybrid projects just fine with a glue stick. I don't recomment liquid glue except for attaching heavier things like buttons to a project, because liquid glue wrinkles card stock or photo paper. My preference, and really the easiest way to go, is a glue runner. They have a highly sticky adhesive attached to rollers and you just run the roller over your surface and attach what you're gluing, and you have an instant bond. Glue runners are fairly inexpensive and can be found at any craft store or Wal Mart scrapbooking section.
Now we're on to the fun stuff. Another thing I find really important for my hybrid is ink. I ink the edges of almost ALL my hybrid projects. It gives a finished look to them, and is also very handy for disguising scoring lines from templates. Ink pads can be found at craft stores, and Wal Mart scrapbooking sections. This one is from Martha Stewart, and comes with six different colored inks. I use mostly brown and black ink on my projects, so you could also just get one or two single ink pads.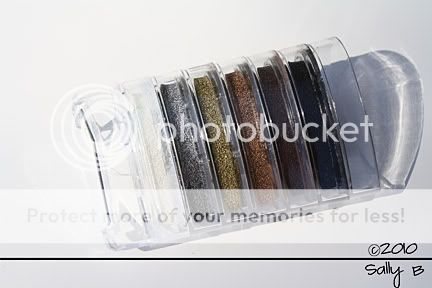
These last three things are the fun stuff about hybrid. You can add them to your projects for extra punches of fun and color, and they make really cute additions to any project. These are my top 3 favorite hybrid embellishements.
Ribbon Flowers
 Buttons
For attaching buttons to projects, I suggest Aleene's clear gel Tacky Glue. Buttons are just a bit heavy for the glue runner or a glue stick to attach them firmly. A hint about Aleene's though, a little goes a VERY long way, so use it sparingly.
I hope this gives you all a better idea of what you might need to jump fully into the world of hybrid. If you have ANY questions, post them here as a comment and either I, or one of Jennifer's other hybrid girls would love to help you out! I know that in the beginning hybrid can be a little intimidating. When I first started hybrid I was scared to death! But, it really is so much fun, and watching something come together as a finished project you can actually touch, is awesome. So go get yourself a few hybrid supplies, and jump on in, I promise once you start, you'll be totally addicted!
Monday, March 29, 2010
Meals In Minutes
Hi all! Kat here with another edition of Meals In Minutes. I have noticed a lot of people asking about Weight Watchers recipes lately so I thought I would share one of my favorites. This could be served as a side dish or even dessert - it's that YUMMY!!!
Caramel Apple Salad
Number of Servings: 16
Weight Watcher points: 1
8 oz. tub of Cool Whip FREE
1 box sugar-free instant Butterscotch Pudding mix
14 oz. can pineapple tidbits in juice
4 large Red Delicious or Fuji Apples (you can use any other type of red apple, I just prefer the Fuji myself)
4 large Granny Smith Apples (or more)
Directions
Combine pudding mix and pineapple (with juice) in large bowl. Mix well and set aside. Dice apples into small pieces and combine with pudding mixture. Fold in Cool Whip FREE till well mixed. Chill and serve.
* This is also delicious made with Sugar Free Vanilla pudding. It doesn't have the same 'caramel apple' flavor, but it is incredibly yummy!
Nutritional Info
Calories: 90.7
Total Fat: 0.4 g
Cholesterol: 0.0 mg
Sodium: 27.8 mg
Total Carbs: 20.1 g
Dietary Fiber: 3.1 g
Protein: 0.2 g
I hope you all try this and enjoy it as much as I do! Have a great week!!!
Sunday, March 28, 2010
Feel like shopping???
Feel like shopping? The first 10 people to shop in my store at TDC today can use the code jfd_40off-4promo for 40% off your purchase (excludes collabs). Enjoy!
Read more...Sunday Spotlight!
Hi there, Sprauncey1 (Kim) here with a Sunday Spotlight to hopefully inspire you! I actually started this post this morning with full intention of spotlighting another kit of Jennifer's (Rough and Tumble) but then realized that it had been spotlighted twice before! Can you say we like Jennifer's boy kits? So I went with my option B: Lil Dude because well...as a mom of two boys, I need all the inspiration for scrapping them I can get! And this kit is so fun, let's check it out!:
Lil Dude by Jennifer Fox Designs, Nikki Epperson, and Melissa Bennett (available at The Digichick botique):I mean this is the epitome of little boy kit (and how can you go wrong with that super-power design team?!!) The bright and fun colors, the cute little vehicle elements, the loopy string and all the fun shapes are just perfect for your little explorer! Let's see what fellow digiscrappers did with this super-powered kit!:
By Nikki Epperson:
By Bexy:
By **Holly**: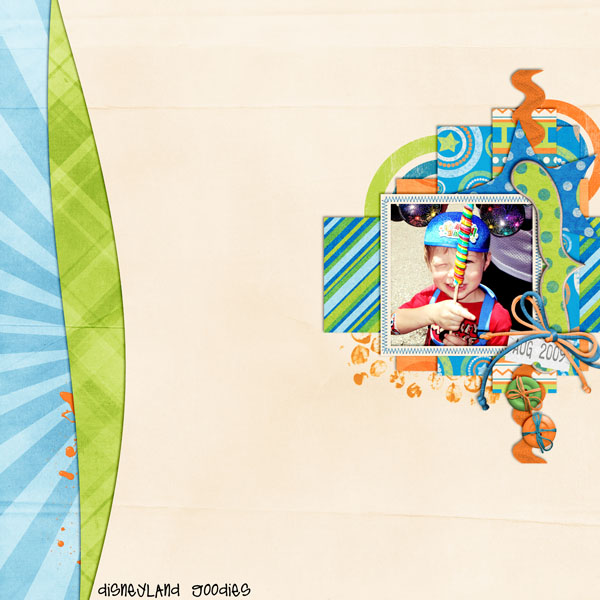
By Erin:

By Shawna: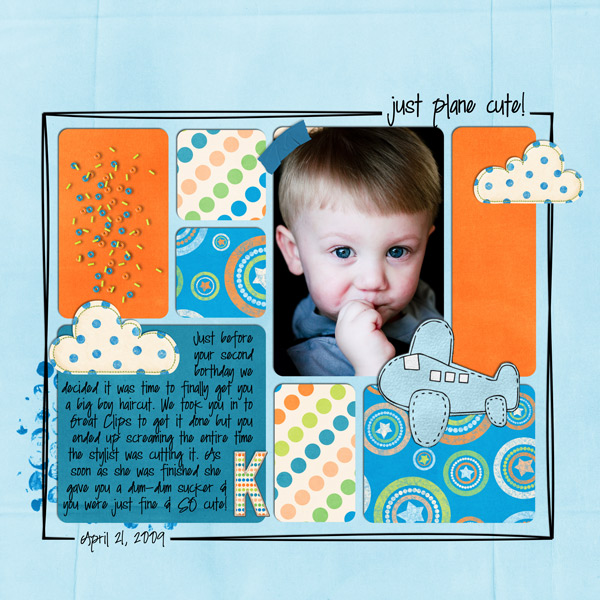 Ok, now I am inspired to scrap with this kit again! Seriously so much awesomeness here! All the images are linked so be sure to leave some love for these awesome ladies, and don't forget to check out the kit in Jennifer's The Digichick store! Happy scrapping!
Saturday, March 27, 2010
Scrapping Tutorial - The Alignment Tool
Happy Saturday Everyone!! Are you all enjoying your weekend? I know that I am! And guess what - I have a fun little scrapping tutorial to share with you all today :) I hope you are excited!
So this tutorial is dedicated to aligning layers (elements, papers, alphas - you name it, you can align it). Photoshop has a wonderful one click process for aligning items along a straight line. So you can align items by the bottom edge, top edge or center.
The alignment buttons can be found in the options tool bar when the move tool is selected. (my screen shot is of PS CS2 so it maybe slightly different for the newer versions).
So how does this tool work? Make sure all the items you want aligned are selected (hold down the control key and click on each item in the layers palette). You then click on the desired alignment button. And voila! Your items are now aligned! Easy Peasy!

I use the alignment buttons quite often while scrapping to help me with my alphas, to center a background paper. Those buttons are very handy!
Alrighty - I hope you all found this tutorial helpful! Have a fantastic Saturday!
oh - and if you are wondering which kit those gorgeous flowers are from - check out Jennifer's newest release Whisper of Spring!
Read more...
Friday, March 26, 2010
April Desktop Freebie!!!
Hello!! Yay for April and hopefully nice spring weather!!! I'm popping in today with your Friday Freebie..... April Desktops!!!
There are both mac & pc versions included, and the desktops come in 3 sizes.
Hope you enjoy them!!!
Click here to download!!
Thursday, March 25, 2010
New Releases--3/25 and a Blog ONLY Coupon!
Happy Thursday, everyone! Today I have several new goodies in my shoppe at The DigiChick.
First up is Whisper of Spring. I love the soft, muted colors of early spring and I chose to bring them to you in this pretty kit, Whisper of Spring. This kit has those gorgeous spring colors that I just can't get enough up, paired with beautifully textured papers, and easy to use elements. Whisper of Spring is perfect for all of your springtime layouts, but also works perfectly for baby and Easter pages.
 Next is Easter Sunrise. Easter Sunrise is a faith based Easter kit that's perfect for all of your Easter morning photos. This kit is also perfect for Baptism and Christening layouts.
You can also purchase Whisper of Spring and Easter Sunrise in this cost saving bundle:
 While you're shopping, be sure to check out some re-releases of old favorites My Little Garden, Lil' Dude with Melissa Bennett and Nikki Epperson, and Bounce With Me with Nikki Epperson. There are so many fun new products in the store today and you can grab them all for 20% off for today only!!!
One more tiny thing--just for you, my faithful blog readers. :) For today and tomorrow (Thurs and Fri) only, spend $15 in my store and get an extra 30% off!!! Simply use the code
jfd-blog_30
at checkout for your additional 30% discount. Enjoy and happy scrapping!
xoxo
Jennifer
Read more...
Tidbit Thursday
Hey everyone, Kat here with a little Tidbit Thursday for you. I have been racking my brains trying to figure out what I was going to blog about today and then I cooked dinner... LOL!!!
Have you seen these???
If you haven't, find them!!! I used this one - The Rosemary Roasted Chicken With Potatoes tonight and it was D.E.L.I.C.I.O.U.S.!!! Although, I have to admit that I used chicken breast rather than thigh meat because that's all I had on hand. And, we had boiled artichokes with lemon pepper mayo for dipping. Even my kids loved this one!
I can't wait to try the Garlic Lime Fajitas! I would love to hear if you've tried any of the other ones!!!

Wednesday, March 24, 2010
Hybrid Humpday
Hi all! Donna here again and I have a simple hybrid project to share with you today. I used Jennifer's new kit coming out tomorrow, Whisper of Spring...
To start off... I drafted my card on a 5x5 document and resized the elements I wanted to use on my card.
I created the flower using one of the papers in the kit, 4 strips layered on top of each other. I resized the layered strips so the polka dot prints looked a bit smaller).

Print this on an A4 sized photo paper
(actually I added another polka dot/strip flower, slightly smaller, before I printed this off :D)

Trim/cut using scissors or craft knife, whichever you prefer...

Ink the edges of the flowers, leaves and the ribbon strip...

Crumple the flowers and leaves, just to give a slight distressed look.. and add foam/dimensional tape on the big flowers....


Use pleating technique on the polka dot piece (ribbon)

Layer the flowers and leaves as seen in the image. Add a button on the center of the layered flower.

Design your card

(Other images: Leah Bunny on a basket and Easter sentiment by Whimsie Doodles)
Hope you liked it :) Happy crafting!
Read more...
Sneaky Peeky!!!
Jennifer has a super springy kit coming out tomorrow at The Digichick!!! I am here to give you a little peek of it. I also was able to scrap last night. I live in Phoenix, AZ so spring is something we rarely get. But this year as been fantastic!!! We have had tons of rain and plenty of sunshine. Our temperatures have hovered right around high 60's low 70's. It has been fabulous!! So I took the kids to the park and was able to get some awesome pictures of them but the lake. The sun was is a great position and everything look wonderful. Jennifer's new kit was perfect for scrapping. I hope everyone is enjoying their spring!!

Tuesday, March 23, 2010
I Love Easter Dresses!
In my family, it's a tradition that all the girls get new dresses for Easter. I still haven't been shopping and I need to do it...like now. But since I can't go right this second, I thought I'd look around online to see what I could find. Wow, there's so much to choose from! I started at Nordstrom, just because I love shopping there and I found plenty.
I am just in LOVE with this dress. I love the simplicity, the gorgeous trim, the shape...all of it. It's the Kate Spade 'Ronnie' dress. Perfection. Of course, I'm a huge Kate Spade fan anyway, so it's no surprise that this is my favorite of all the dresses I've seen.
 I also really like this Maggy London Print Matte Jersey Shift Dress. It's totally different, but I love the modern feel. Plus, it's never really warm here at Easter, so the sleeves would work for me!
Finally, I adore this Eliza J Pleated Stretch Cotton Dress. It is so spring-y and I just love the colors!
 As much as I love grown up clothes, these little girl dresses are just precious. Seriously, how much cuter could they be?!?
 You can find these adorable dresses at http://www.pinkprincess.com/easter-dresses.html.
Finally, who can resist a little bit of doggie glamour? This just cracks me up.
 Photo: REUTERS/Jeff Christensen
 So, have you found any must have fashion for Easter (or spring) this year? If you've found something that I just can't live without, link me up! I'm always up for a good shopping spree.
Read more...Monday, March 22, 2010
Monday Meal-Easy Peasy!
Happy Monday to you all!! Leila here to share some more deliciousness from my kitchen. Since today is my eight anniversary and my husband's birthday, I'm posting his favorite dinners. Fortunately, the rest of us love them too!!
First up is the super easy Salsa Chicken. Only take out is easier than this--but trust me, this is so much better!
Salsa Chicken:
Ingredients:
4-6 boneless skinless chicken breasts
1 packet taco seasoning
1 cup salsa
shredded cheese
Directions:
- Preheat oven to 350°F
- Very lightly coat a 9x13 baking dish with non-stick cooking spray.
- Place chicken in dish then coat with taco seasoning packet.
- Pour 1 cup salsa (or more if you want--we always use the whole jar) over the chicken.
- Bake for 30 minutes or until done.
- Remove from oven and top with cheese. Place back in the oven for 5 minutes or until cheese is melted.
Notes:
We like to shred this up and serve it as a taco filling. Add a side or yellow rice and black beans and you've got a great quick and easy meal!
---------------------
And now for the other favorite. If there's any one dish that Andrew requests the most, it's this one. He loves it so much he even makes it on his own!
courtesy Campbell's
1 tablespoon vegetable oil
4 boneless pork chops, 3/4-inch thick (about 1 pound)
1 can (10 3/4 ounces) Campbell's® Condensed Cream of Mushroom Soup (Regular or 98% Fat Free)
3/4 cup milk
1 package (1 ounce) ranch salad dressing mix
Paprika Ranch-Style Rice
- Heat the oil in a 10-inch skillet over medium-high heat. Add the pork and cook until well browned on both sides.
- Stir the soup, milk and 1/2 package salad dressing mix in the skillet and heat to a boil. Reduce the heat to low. Cover and cook for 10 minutes or until the pork is cooked through. Sprinkle with the paprika.
- Serve with the Ranch-Style Rice.
- Ranch-Style Rice: Heat 2 1/4 cups water and the remaining salad dressing mix in a 3-quart saucepan over medium-high heat to a boil. Stir in 1 cups uncooked regular long-grain white rice and cook according to the package directions.
- Serving Suggestion: Serve with a vegetable blend. For dessert, serve chunky applesauce topped with cinnamon.
Notes:
This one is great as is though I do use cream of chicken soup to appease my dislike of all things mushroomy. We do serve it with stuffing instead of rice. It just gives it this seriously warm comfort-food feel. Veg of choice? Green beans. YUM!
So there you have it: Andrew's favorite meals. Happy happy 'birtheversary' to my wonderful husband! I can't wait to see what the rest of our lives will bring!
Read more...

Sunday, March 21, 2010
Friday Freebie on Sunday
I had this cute layout starter for all of you and forgot to post on friday! It was my birthday, which was why I signed up for that day, so I could share a little love on a fun day! But as it turned out, things got crazy and I just spaced it! Jennifer just posted a fun freebie today, as well, so that's 2 in one day! I hope she won't mind me giving this away too! Just remember to peek below and grab her awesome alpha! I love great alpha's and see myself using this one a lot!

And you can download it HERE Read more...
100+ Blog Followers = Freebie for You!!!
Yay!!! I'm so excited that we have more than 100 faithful blog followers!!! I've been promising for a while that I'd come up with a fun freebie for everyone once we hit 100, so here it is: If you know me, you know I'm an absolute alpha junkie and I love having fun, versatile alphas in my digi stash. This fun uppercase alpha is made of kraft paper and has a fun doodle outline--perfect for any layout! If you're not already a follower (or subscriber), I hope you'll follow or subscribe over there -------> before you grab this! And since you're here, take a look around--our bloggie is full of great inspiration, fun ideas, interesting tutorials, and lots of scrappy goodness. If you want to stay informed and get even more great freebies, coupons, and the latest news, be sure to subscribe to my newsletter at the top of the blog (via my google group).Click here to grab this alpha. If you use it in a layout, I'd love to see it! Link us up in the comments so the team and I can leave you lovies.
I'm off to enjoy a rainy Sunday afternoon with my family. I hope you all have a terrific rest of the weekend. Enjoy your freebie!
Read more...
Spotlight Sunday!!
Kate bringing you a Spotlight Sunday. Hope everyone is having a great weekend. One of my favorite kits of Jennifer's is Rough & Tumble. I'm so glad it's now at the Digi Chick!!!
Here are some of the layouts I spotted in the gallery!!
MamaBee (CT)

RealRach (CT)
KSCroppy
SunshineTK
Subscribe to:
Posts (Atom)


