Saturday, April 30, 2011

Photography Tips!~

Angie here....I am a little late with today's blog post, but better late than never!!! I wanted to share a few tips for taking some fun summer photos~

1. don't take photos in full sun...usually your subject is squinting and the sun is so harsh one side of your subjects face is completely white and one side completely dark
2. try to shoot on ISO 100/200 or 400 for full sun
3. the best time of day is to shoot early morning or late afternoon where you can get fabulous sunlight
4. concentrate your focus on your subjects EYES :)
5. for subjects running through a sprinkler or splashing in a pool use a higher shutter speed of 500 or more....this keeps your subject in focus!
6. don't be afraid to ZOOM in and have your subject's face fill the whole frame! some of these are the best shots I have ever taken!
7. if your camera tries to trigger the flash, turn it off and if you have to use a tripod~
8. find shade and just start shooting until you find just the right spot of light~
9. remember to play play and play with your camera....there is ALWAYS the DELETE button!
10. and ALWAYS try to have a spare battery/batteries, memory card and cleaning cloth handy :)

look at the examples below that I took today of my girls...the sun was VERY harsh it was around noon time so I found a nice shady spot and just started shooting...then I moved in closer! and then I just love that they like to get goofy...so don't worry about everybody looking at the camera, just shoot them in their natural setting, you will be amazed at what you get :)


Read more...

Wednesday, April 27, 2011

Little Pretties by Amy--Winner Announced!!!

Hi everyone! This announcement is coming a bit late, but better late than never! I loved partnering up with the fabulous Amy this month for this fun giveaway. I'm so excited to announce the winner:


Congrats Cheryl!!! Please email me at jenniferfoxdesigns@yahoo.com and I'll get you hooked up with Amy. I hope you enjoy your prize...I KNOW you will!!!

Thanks to everyone for playing and stay tuned for the May Edition of Win It Wednesday, coming soon!

Read more...

May Desktop Freebie

Happy Wednesday Scrappers! Lori here with your May Desktop Freebie! This time I used the kit Bloom. This is one of my favorite kits by Jennifer! The colors are wonderful, and really versatile. This kit would be great to scrap all sorts of layouts, but especially great for fun outdoor spring pics for either girls or boys. I created the desktops in both Widescreen (1440x900) and 4:3 Aspect (1024x768) size. Please click here to download.


So if you haven't picked up this great kit yet, you should! Head over to Jennifer's Shop at 9th & Bloom and pick it up today! Hope everyone enjoys the rest of the week!!

Read more...

Tuesday, April 26, 2011

Tidbit Tuesday...a little late

Hi all, Kara here with Tidbit Tuesday, so sorry it's way late, I was discharged from the hospital today and just got home not long ago. So, let's get on to today's tidbit. Recently I have started watching Rachel Ray, and I went to her website and came across Rachel Ray's nonprofit organization YUM-O here I can across here Pantry Basics, I think it's a wonderful list to have for those who love to cook...and even those who do not love cooking..like me :) Here is the link to the pantry basics and more. I've got some shopping to do...what about you?

Read more...

Monday, April 25, 2011

Meals in Minutes Monday - Taco Soup

Those that know me personally know my home is no where near a kitchen; there are many things I can be classified as but cook is definitely NOT one of them! I'm mean come on I messed up Jello the other day (Jello?! Who does that?! This kid that's who) However, if there is something I decide I'm completely in love with I learn to make it *granted it's easy that is* and this taco soup from my friend Dave was something I had to have the recipe for! So without further ado my first recipe (and probably last). Enjoy!

Taco Soup

1lb. Hamburger
Chopped Onion (as desired)
1can Ro*Tel Peppers
1can Chili Beans
1can Corn
1can Beef Broth (optional depending on how thick you want your soup)
1can Stewed Tomatoes
1 can Kidney Beans
1pkg. Ranch Dip Powder
1pkg. Taco Seasoning

1. Brown hamburger with the chopped onions
2. Drain Ro*Tel peppers, corn, and kidney beans
3. Dump ALL ingredients into crockpot
4. Cook on low for 8hrs.
5. Thank me later!

I know many people that add cheese, chips, sour cream, etc to the top of their soup also. I have never tried it but it sounds amazing! I hope you all enjoy!

~Tricia

Read more...

Sunday, April 24, 2011

Cuppycakes Candy Bar Wrapper

Hello everyone! Happy Easter! Sarah here with a fun little printable for you using Jennifer's Cuppycakes kit. This is a super easy project to do. First download the PDF here . Then all you need is a candy bar, a paper trimmer or a pair of scissors and some adhesive (I used double sided tape tabs).


I used matte presentation paper to print the candy bar wrapper out on. Just cut it out, wrap around candy bar and glue. So simple, but what a cute (and oh so tasty) present.


For those who want to create their own candy bar wrapper the dimensions I used were 5.25" wide by 6" long. It's so easy to create a small personal gift for any occasion, with just a few simple steps.

Hope you all enjoy this little printable. Have a great day!

Read more...

Saturday, April 23, 2011

Saturday School - A big To Do about Drop Shadows

You'll always hear people talking about the importance of drop shadows when it comes to digital scrapbooking.  If you're just starting out you may think you know somewhat what that means, or you could be asking yourself "What's the big deal?"  The big deal, when it comes to shadowing, is that it makes everything look life-like/3D, and it's more pleasing to the eye.

For example, take this page I did using Jennifer's kit She's my Sister.  Before I do any drop shadows, it looks like this:


Yes, it's pretty, and it's still a tribute to my sister, but my shadowed version, here, is much easier to look at and differentiate between the layers:

So how do you go about doing drop shadows?  Everyone has their own settings that they like and directions that look real to them, but my biggest suggestion is to open up your drop shadow settings in the layer styles palette (by double-clicking on the layer in the layers palette) and start playing around on an element to learn what the different settings do.

Let's take a look at them - I decided to zoom into the big pink heart above my sister to show you different effects you can achieve.


The fun parts of fiddling with shadows are Distance, Spread and Size.  Let's see what happens when we change any of those.

This is my heart with no shadow at all:

If I add the basic drop shadow you get if you click on drop shadow and don't change anything, it looks like this - you'll notice the shadow went up and to the right.  It does look more 3D now, but let's play with the settings a bit.


Now, I've changed my shadow direction to 45 because I like it that way better, but here's what happens when you increase the Distance (the first slider).  The shadow moves away from the element in the direction you've told it.  If you slide the distance over too much, it will make your element look like it's floating on the page (instead of being ON the page).


By adjusting the Spread slider, you can make the shadow appear on both sides of the element - see to the bottom right of the heart here, you can see the shadow where before there was none.

The size slider changes how fuzzy it looks - see here how soft the edges look compared to the previous image, the size slider is about halfway over on this heart.

By adjusting all 3 sliders and watching the results, you can achieve a natural-looking shadow, even without customizing further by choosing color, opacity and warping your shadows.  These are the settings I ended up with for my heart:

And there you have a basic guide to drop shadows! 

Read more...

Friday, April 22, 2011

Raining On Sunday Product Spotlight


Hello! Cindy here to spotlight Raining On Sunday. I love rainy days, especially when I can snuggle up with Cole and watch a movie. Jennifer created this kit with those warm, relaxing days in mind.

This versatile kit is perfect for your boy pages, but also works great for girls and grown-ups! The faded colors, muted textures, and fun elements will make you reach for this kit again and again.

Check out these fantastic layouts!

By Angie


By Ella


By Michelle


By Tara


I hope these layouts have brought just the right picture to mind! We’d love to see what you do with this fabulous kit. Link us up in the comments section so we can leave you some love. I hope you have a great Thursday!


Read more...

Thursday, April 21, 2011

Going, going, and will be gone forever

That is my grab bag will be :)


This Just For Fun Grab Bag features 5 brand new products. Individually, these items retail for over $14.00!!! Get them now for only $4!!! That's a savings of over 70%!

Just For Fun Grab Bag includes one kit, one pack of coordinating krafty solids, one alpha with lowercase letters, numbers, and punctuation, one set of clipping masks, and a 4 pack of templates. See the detailed images for full size views of all of the products included.

Notes:

  • Papers are 12 x 12, 300 dpi, .jpg format.
  • Elements are 300 dpi, .png format.
  • Drop shadows are for preview purpose only.
  • My products are S4H/S4O friendly.


and a beautiful layout by one of my CTM's


So what are you waiting for??? Get to shopping you know you wanna :)

Read more...

Tuesday, April 19, 2011

Easter is around the corner....

Hello everyone! Tara here with this weeks Tidbit Tuesday! If you celebrate Easter or not, there are a lot of fun spring things to do with your family. I have found a few websites that have some great projects to do with your family.

Kaboose.com

Family Fun

All Crafts

I can't wait to do a couple of these with my 6 year old son. He will be excited to be a little crafty.

I have to admit......I do love Easter and everything about it. It is as big as Christmas to me. So, needless to say, I tend to go a little overboard. :) We have a lot of traditions around my house when it comes to this holiday. We love to color eggs, do egg hunts, go to church as a family, have a special lunch with family and finding a basket from the Easter bunny.

What are your favorite traditions for Easter? I would love to hear about them. I may need to add a new tradition or two to our Easter. :)

Read more...

Monday, April 18, 2011

Meals in Minutes 4//18/11

Good afternoon everyone, Kara here with today recipe. I apologize for it being late. The hospital's internet hates me and keeps kicking me off. So I am hoping I can get this posted before it kicks me of again..lol. Hope everyone had a great weekend.


Macaroni Alla Norma Recipe

  • 1 pound eggplant

  • 1/4 cup extra-virgin olive oil

  • medium onion, chopped

  • garlic cloves minced

  • 1 (28-to 32-oz) can whole tomatoes in juice

  • 1 pound elbow macaroni

  • Parmigiano-Reggiano for sprinkling


  • Trim eggplant and cut into 2-inch pieces.
    Heat oil in a 12-inch non-stick heavy skillet over medium-high heat until it shimmers. Cook eggplant with 3/4 teaspoon salt and 1/4 teaspoon pepper, turning occasionally, until browned and softened, about 6 minutes. Add onion and garlic and saute until onion is translucent, about 5 minutes. Add tomatoes and oregano, and cook, stirring occasionally and breaking up tomatoes with a wooden spoon, until sauce is thickened, about 15 minutes. Season salt with salt and pepper to taste.
    Cook pasta in a large pot of well-salted boiling water. Drain pasta then toss with alla Norma sauce and sprinkle with cheese.


    Read more: http://www.kitchendaily.com/recipe/macaroni-alla-norma-142609/#ixzz1Jtxm14Xh


    If you try it, be sure to stop by and let us know how you like it! Have a fabulous day!

    Read more...

    Sunday, April 17, 2011

    Scissors Sunday - Hybrid Card

    Hey everyone!!  I am Michelle (aka mdel) here to bring you a cute hybrid project that is simple & cute.  For this project I used Jennifer's Just For Fun Grab Bag which is in the store now at 9TH & Bloom for a limited time.  Here's the preview of the Grab Bag:


    With just a few supplies I created this adorable card:


    Full credits: Just For Fun Grab Bag by Jennifer Fox Designs, Recollections card stock, Foam Squares from Michael's.  
    Font: sf Twelve Again.


    Hope you have a great week!!!!

    Read more...

    Saturday, April 16, 2011

    Saturday School: Photo Blends

    Hi Everyone!!!  Its Jenn (jk703) here to stop in for a Saturday tutorial!  Can't wait to get started!

    First... Have you seen BLOOMFEST?!  O Mi Gosh... I went over and didn't know where to look first!  Here is Jen's awesome Just For Fun Grab Bag... which by the way, is such a steal!  Check it out!

    I was asking the girlies on the CT what they themselves wanted to learn, and a suggestion was a photo blend.  This type of blend is the one where you will see a photo blended into the background paper!  So here we go.... but remember - there are so many ways to do this little technique!  This is my own take on it, and a pretty simple one too!

    First, open a blank document, a plainish background paper to practice on and a copy of a photo.  When I am working on something, I save it with the title Working Copy, this way I know what I am working on, and can title it will all my used products at a final save.  

    I've used Jen's Grab Bag - Just For Fun Tinted Krafties for my example. The picture is my son crusing around on a small quad, and not crashing!  :)

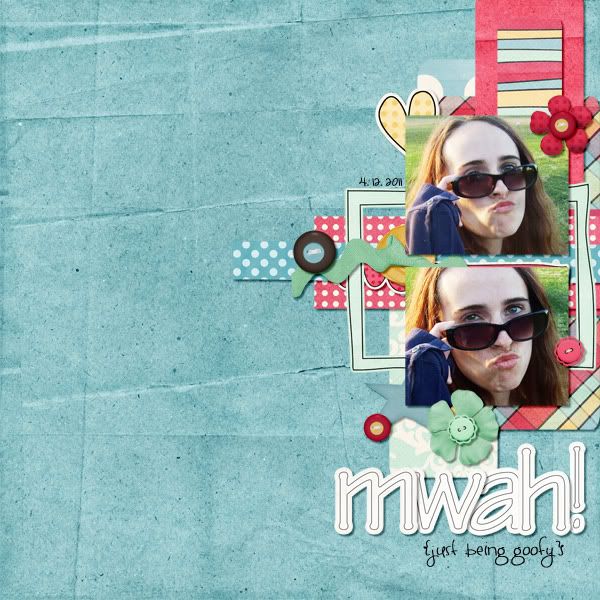
    Place your background paper, and then the photo on top.  When placing your photo, place it where you would like the main part of the image to remain.  Here is how I placed mine: 


    Now... on the Layers Palette, with the photo selected, you can scroll through the different Blend Modes that are available to you in PS or PSE. 

    TIP:  To "see" what all the blend modes look like with your picture is to do this:  Choose the layer that will be blended in the Layers palette.  Now, press the Shift key, and use your + and - keys to "scroll" through the different blend modes. How easy and cool is that?!  


    I really liked the Luminosity blend mode and I also liked the Linear Burn, and Multiply.  Look at them all though - each picture will have a different effect determined by the background paper you choose as well as the picture itself.  Here is the Luminosity blend mode:


    And here is what my Layers Palette looks like - yours should look similar. I also changed the Opacity of my photo so it was a view that I liked. It is at 55%. 


    After the photo blend mode is complete, you will now "erase" part of your picture.  Choose the eraser tool, and make sure it is in Brush Mode. You want to have a soft brush, and you can play with the opacity for your erasing.  For my picture, I used an Eraser opacity of  about 65% and my brush was about 500 pixels. 


    Next, you will begin to erase your photo.  Go slowly, and first stick to the edges. Gradually go over the harsh square/rectangular edges of your photo.  Move closer into the subject and get as close as you like.  Make it visually appealing to you!  Here is mine:


    Guess what!?  That is it!  You thought it was a lot harder, right!?  So did I until I learned how!  But wait... you can do more.... Say you want to mix up the look.  Duplicate your finished blended photo, and then try additional blending modes and opacities!  Here is one that I just plain duplicated the image and put the blend mode on Multiply.


    And here is one where I duplicated the blended image, the first layer uses the Luminosity Blend Mode and for the second image, I chose the Color Blend Mode. 


    There you have it... and easy way to do a quick blend of a photo into a background paper!  Hope that you liked it!  If you would like to learn a specific technique, just comment here and I be happy to make a tutorial up!  I would get to learn something too!

    Happy Saturday and Go check out Bloomfest!  
    Jenn
    (jk703/The Typative Scrapper)

    Read more...

    Friday, April 15, 2011

    New Release and Bloomfest 2011


    Bloomfest 2011 has finally started! Check out the fabulous grab bag that Jennifer has created.


    Here's a closer looker at what's included:


    CT Inspiration:


    Now that's a whole lotta gorgeousness, isn't it? Hurry and get the grab bag now because it will only be available at this low price through April 21st. After that, the grab bag will be split up, and you will have to grab each part separately.


    Now, finally, for the winner of this fabulous bag. Thanks to everyone for your comments! I know Jen appreciates all the good things you have to say. I had my trusty friend Mr Random.Org help me choose the winner. Congratulations to #5 -- Jewely Bug! PM Jennifer at 9th&Bloom to collect your prize.


    Read more...
    Related Posts with Thumbnails

    Disclaimer

    As a creative team member for several digital scrapbook designers, I have received their products for free in return for creating and posting projects (digital layouts, hybrids projects, etc). Many of the layouts you see here were done in conjunction with requirements for these creative teams. Please be advised that the products used were indeed received for free.
    The Daily Scrapper - Topsites Best Scrapbooking Sites, Digital Scrapbooking, Scrapbook Supplies, Reviews, Awards
    List of the Best Digital Scrapbooking Websites by Scrapbook MAX!SCRAPBOOKING TOP 500 The Daily Scrapper - Topsites Free Digital Scrapbooking

      © Blogger templates Newspaper III by Ourblogtemplates.com 2008

    Back to TOP