Friday, April 30, 2010

May Blog Train

Welcome to my portion of the May Mega Blog Train! I'm super excited to join this HUGE train that features over 100 designers!!! This month's theme is Summer Surprise and I love the color scheme. This mini kit features fun colors, super cute elements, great papers, and even a coupon from me!


Click on the preview or HERE to grab my part of the kit.
From here, you should head over to the Dysfunctional Design blog. If you get lost, you can find a list of ALL participating designers and links to their contributions at the Blog Train Blog. You'll also find a slideshow that reveals each and every part of the kit there. Please be sure to leave some love at each of your stops. Also keep in mind that we are all in different time zones, so be sure to check back if a part seems to be missing.
While you're here, why don't you follow my blog and subscribe to my newsletter? You'll get announcements, be the first to hear important news, and even get great coupons and freebies!!! Hope you enjoy and remember to link me up to any LOs featuring my stuff--I'd love to see what you do!
Until next time,
Jennifer ♥

Read more...

Sneak Peek!

Hi everyone! Jennifer has not one, but TWO grab bags coming out tomorrow. One is a solo project, and the other is an amazing 3-way collab with Nikki Epperson and Laura from simply.scraps! I'm here to bring you a sneak peek of Jen's solo Grab Bag. Check it out!


Make sure you come back tomorrow, I will have a HUGE blog post for you with a tutorial, a massive template pack freebie, an iNSD sale, and a look at BOTH grab bags!

Happy Friday!
~Sally :)

Read more...

Freebie Friday!! May Desktop

Hi everyone!! Erin here with today's Freebie Friday! And it's an amazing May desktop calendar made by the glamorous Leila!

Click here to download.

And a little reminder to come back later today for a peek at the yummy grab bags that Jennifer has coming out Saturday! YAY - what a fabulous start to iNSD!

Read more...

Thursday, April 29, 2010

Tid-Bit Thursday! Let's Get Ready for iNSD!

Hi All! Erin here with today's Tid-Bit Thursday! So as many of you know, this weekend is {inter} National Scrapbooking Day!! So that means lots of sales - and I'm here to help! I've checked some of the major forums and found some great resources for all weekend events and sales.

Starting at DigiShopTalk - they have a whole section in their forum dedicated to iNSD. You can go there to chat, look for sales, activities, freebies, RAKS, games and contests.

Persnickety Prints has some coupons posted on their site! (including an awesome one for Jennifer!)

Log Your Memory has a great iNSD planner - you can check out the details here.

If you are on twitter - follow The Daily Digi as they will be tweeting on Saturday about all the great deals they found around digiland.

So that's all I was able to find - please check back because I will be updating as I hear about more iNSD news!

Read more...

Wednesday, April 28, 2010

Hybrid Humpday

Jen here, babbling at you once again! It's that time-it's Hybrid Humpday once more!! In fact, it's the last Hybrid Humpday in April!

Summer is about to arrive, and with that comes guests, at least for my family. Because we are a military family and move every few years, there is never a shortage of people who want to come visit us and stay for a while. Visitors are the perfect time for me to play with my hybrid skills- I always like to put together some kind of goody box to leave in the guest room to help make everyone feel at home.

Jennifer has out a gorgeous new kit that was perfect for my project. Raining on Sunday is soft and homey, great for making a house full of goodies.


I used a template by Pixel Geek designs to make this house. I clipped my papers and elements to the template, and printed it, then followed the step by step directions to assemble. I added a cute little button for a doorknob, and I'll add photos to the windows when I know who is coming to visit.

Photobucket

This project was soo easy and so much fun! I'd like to encourage you to grab some hybrid goodies and create something for your guests this summer!

Have a great day!

Read more...

Tuesday, April 27, 2010

Turn It Up Tuesday - Comfy Cozy Beds

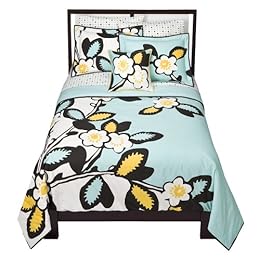
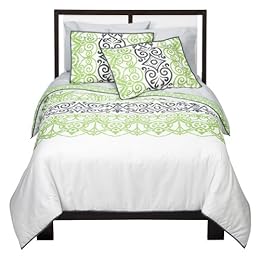
Hi everyone! Jackie here bringing you today's edition of Turn It Up Tuesday! I'm really excited about it too because I just love looking at bedding sets and dreaming about all the fun ways my bedroom could look if I had good decorating sense. But I don't, so instead I drool over bedding I see in advertisements and stores. I just have to share some that I saw recently - the colors are just amazing. (Maybe Jennifer can be inspired by some of these and make some cute kits? What do you think? **wink, wink**)

I do believe I'd fall asleep the instant I would lay down on them. How about you?

from Target


from Target


If you have a favorite bedding item you've been eyeing (or have already) link me up. I'd love to see it!

Read more...

Monday, April 26, 2010

Meals-in-Minutes Monday

Hi everyone! Kendall here to bring you another edition of Meals-in-Minutes Monday. I have to be honest; Mondays are hard for me. Heading back to the daily grind after enjoying a nice weekend with the family isn't easy for any of us, right? So if you're like me, the last thing you feel like doing on a Monday is worrying about what's for dinner. Well, you're in luck! I've got a super-easy, fast recipe to share with you today. (It's great for any day of the week but especially comes in handy for days when you just want to make something quick and delicious).

Baked Honey Mustard Chicken

Ingredients:

• 6 skinless, boneless chicken breast halves
• salt and pepper to taste
• 1/2 cup honey
• 1/2 cup prepared mustard
• 1 teaspoon dried basil
• 1 teaspoon paprika
• 1/2 teaspoon dried parsley

Directions:

Preheat oven to 350 degrees F.

Sprinkle chicken breasts with salt and pepper to taste and place in a lightly greased 9x13 inch baking dish. In a small bowl, combine the honey, mustard, basil, paprika, and parsley. Mix well. Pour 1/2 of this mixture over the chicken, and brush to cover.

Bake in the preheated oven for 30 minutes. Turn chicken pieces over and brush with the remaining 1/2 of the honey mustard mixture. Bake for an additional 10 to 15 minutes, or until chicken is no longer pink and juices run clear. Let cool 10 minutes before serving.

It's so easy to make this dish, and the best part is that it only takes about 15 minutes to prepare. Then, just pop it in the oven for a half hour, and you're ready to eat. Oh, and did I mention it's also low-fat? Woot! My family loves this recipe, and I hope yours will too!

Read more...

Sunday, April 25, 2010

Let it Shine on October

Happy Sunday everyone!  Jackie here with today's blog post - Spotlight Sunday.  Today we have the spotlight on one of Jennifer's customers - October (obumpus).  I hope you enjoy learning about her as much as I did!  


1.  Tell us your name and a little bit about yourself.  
Hi! My name is October, and no, my birthday is not in October! I've been married for nearly 7 years now, to a wonderful man named Fletcher. As he likes to say, we're the family of strange names. We don't have any 2-legged
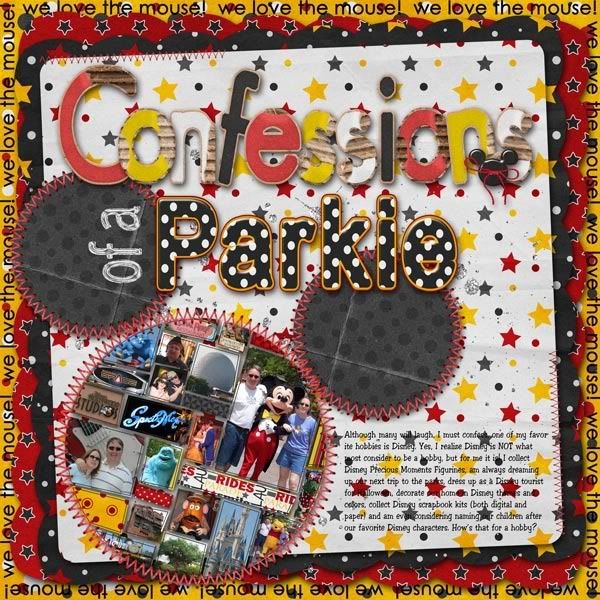
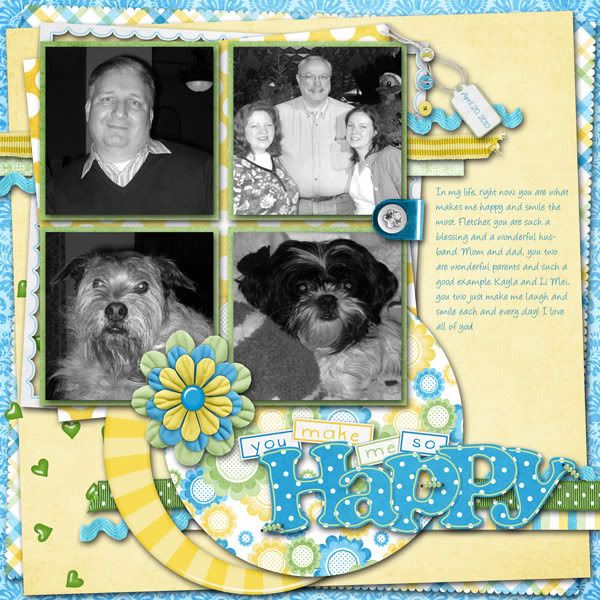
children but hope that will be changing soon. We do have two 4-legged children, both dogs, and they are both extremely spoiled. You'll see them in a lot of my LO's! I adore anything Disney and am a self-proclaimed parkie. I hope to have my travel agent's license by this summer and plan to start my own Disney planning travel agency.

2.  How long have you been scrapping?  Were you a paper scrapper?  Are you still?  
I started paper scrapping about 8 years ago now, I guess. I've been a little sporadic in my projects due to not wanting to get addicted (I knew it would happen). In 2005 my DH and I took our first vacation together and went to Disney World. While there he "forced" me to purchase a bunch of paper scrapping supplies and I completed a HUGE Disney album when we got home. I first became interested in digi scrapping about 3 years ago but was slow to start. I got going full force about 2 years ago now I guess. Currently I use PSE7, but have CS3 on my computer, it just intimidates me. I need to take a class on it, or something because it has some features that rock! Now, due to lack of space, I only digi scrap but I still have all of my paper supplies. I still find something therapeutic about glue, scissors, glitter, ribbon and stickers so I doubt I'll ever fully go digi. I want to do hybrid, but for some reason it scares me, LOL!

3.  What gets you in the mood to scrap? 
Scrapping is a stress reliever for me. I love to be creative and scrapping gives me a perfect outlet. I'm a total template freak and more often than not my LO's start with one. You may not recognize the template
when I'm done with it, but I find they're a great starting point. When I need to relive one of our happy Disney moments, I'll scrap a LO, or 5, just to get me in a happy mood! As well, oftentimes my dogs do something crazy that I have to document. Generally my LO's are inspired by the pictures and then I build with the kit, seldom do I find a kit and then take the "perfect" picture to match it. I tend to listen to "happy" music when I
scrap (think Big Band, Sinatra, 
Nat King Cole, or 50's music, sometimes Disney soundtracks too) and this helps me keep going for hours!

4.  Do you look for certain things in a kit when purchasing (color, elements, alphas)?
When purchasing a kit I generally first look at the theme and see if it's something I think I can use, then I go to colors and from there elements. I prefer kits with alphas, but I've got quite the alpha collection so I
generally can find what I want in my stash if need be! I also like to have a lot of paper options. My LO's tend to resemble paper LO's and I always have used lots of paper and cardstock since they are so versatile and cost
effective! 

5.  Share with us some of your favorite layouts:


6.  What is your favorite Jennifer Fox product?  I really like Cuppycakes.  Unfortunately I don't have any great birthday pics to use it with right now, I may have to black and white some of my old pics from when I was little just so I can use it. The kit is so fun! I need to get the pics off my SD card of my nephew and scrap some pages using her Lil' Dude collab. That kit is great for little boy pics!

Thanks so much to October for being in the Spotlight this Sunday!  

Read more...

Friday, April 23, 2010

Scrap Like Nobody's Looking

Hello Girls!

Katharyn here. I'm one of the {lucky} new chicks at Jennifer Fox Designs and I've gotta say, I'm thoroughly stoked to be here.

Just a heads-up, I'm an Aussie, so any slang or spelling oddities you may come across here today are perfectly justified. ;)

I've got this layered template for you and I'm soooo hoping you'll have fun using it. I am an unashamed user of templates. I know there are some of you out there who consider it "cheating" unless you create something totally from scratch. I'm not one of them.

Why not use them? If you need a no-stress layout that records a story and illustrates it with a photo or two, then what's wrong with taking this easier, quicker approach to get it done? I'm all for learning new photoshop techniques and sometimes attempting to create absolute masterpieces that would make even Martha Stewart blush (or Ali Edwards, or Cathy Zielske, or whomever it is who's your scrapbooking goddess).

But between you and me, there are times that I just want to scrap like nobody's going to be looking at it. It's just for me. It just needs to make me happy. Not every page needs to be perfect, gorgeous, or even created from scratch. In the same way that not every cake you make needs to be made from scratch - I sometimes use a packet mix - Eeeekkk!!!! Does that make me less of a mum? Do the kids say it tastes different? Nah. It's all good.

I'm not saying cut all your corners. But just don't make it harder than it has to be. There is a time and a place to focus on all aspects of your scrapping - from developing your photography skills, to learning how to fix them up digitally. From focussing on your titling work, to working on your drop shadows. And there is a time to painstakingly 'umm and ahh' about where to place all your elements and photos about the page, and a time to say "You know what? I'm going to concentrate on the story / photo/ kit this time around." Using someone else's sketch, and crediting them for it, is ok.

As busy mums, or working career women, or volunteers, or whatever - our scrapping time is finite, so we need to use it wisely.

And just so you know, we who make layered templates, enjoy doing so. And we enjoy it all the more if it makes your life easier too.

Happy weekend scrappers!


Download this template from here.
And here's what I made with it.


My layout uses Jennifer's "This Woman's Work", available at The Digi Chick here.

Read more...

Thursday, April 22, 2010

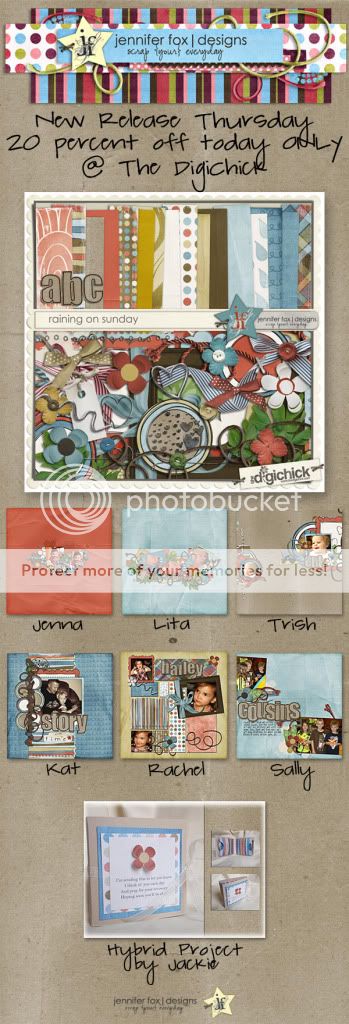
New Release Day! {Raining on Sunday}

Jennifer has this GORGEOUS new kit for you this week. Make sure you head on over to The DigiChick and grab it while it's on sale 20% off today ONLY! And...scroll all the way down to the bottom of this post to find out who our winner from yesterday's Sneak Peek is!


Now...on to the even more fun stuff! Yesterday, we asked you to leave us a comment telling us what you love about rainy days for a chance to win Raining On Sunday. I loved reading all the comments and found myself nodding to most of them, because they were things I love about rainy days too. I went to random.org to get our winner, and the winning number was 9...so our lucky winner is....MARA! Congrats Mara! Check your e-mail for your code! Thanks everyone for playing along with us, we might just have to do this more often ;)

--Sally :)

Read more...

Thursday Tid-Bit - Printing!

Hi All! Erin here with today's Thursday Tid-Bit :) I thought that I would share some photobook prices so you all can get your fabulous pages/books printed! I must be honest - I haven't printed any of the pages I've created in the past year. So I'm excited about this post too!

I decided to check out these sites Shutterfly, Persnickety Prints, Artscow and Snapfish. And since I scrap 12x12, I will be sharing those prices. If you scrap smaller, the prices will be less :)

First up is Shutterfly. They currently are running a promo until April 29th for up to 30% off all photobooks. And another promo for free shipping over orders of $30. So what's the base price for a 12x12? It's $54.99 for a Hard Photo Cover.

Next up is Persnickety Prints. I couldn't find any promos (there might be some though!) so the base price for a Classic 12x12 Photobook is $39.99.

Now let's look at Artscow. A custom book with 40 pages is $44.99. They also have a promo running until April 26th for 30% off all personalized photo gifts.

I know there are more places out there - but I thought I would only put 4 up on the blog. So our last stop is Snapfish. The starting price is $49.99 - they do have a promo for Mother's Day for 20% off the first 20 pages.

So there you go - a couple of different places to get your books printed and some info on the current promos. I hope this helps you all out! Have a fabulous Thursday! (and don't forget to check out Jennifer's new release - Raining on Sunday!)

eta: I just got an email this afternoon from Shutterfly. 50% off their photobooks if you use this code: EXTRA29 it expires April 29th (thought I would share :) )

Read more...

Wednesday, April 21, 2010

Time for a Sneak Peek and a Chance To Win!

Jennifer has a GORGEOUS new kit coming out this week, take a look at the Sneak Peek and make sure you come back tomorrow to check out the full kit.


Check out this GORGEOUS layout by Trish:

Would you like to win this kit before you can buy it? Simply post here and tell us one thing you like about rainy days and we'll be back before midnight EST to choose one lucky winner!!!

Read more...

Hybrid Humpday--Spring Wreath

Ramona the Pest here to share with you all my latest hybrid project! I am even including step by step instructions, so you can all whip this up! With the snow finally melting and my trees and rosebushes starting to bloom with little leaves, I wanted to celebrate with something on my door! I love my Christmas wreath, but well, that doesn't exactly work in April! I spent several weeks looking for something fun and bright and not too expensive! With all the other of life expenses, I couldn't justify $40 dollars for a decoration! Then I came up with this fun idea, and used one of my fave's of Jenn's kits to help me out! It was just perfect!


Isn't this kit just darling! You can use any kit you like, and Jenn has lots of darling ones in her shop! Just click on the preview above to pick up this kit!

Next, I opened up a 12x18 transparent screen in photoshop. I have a place that I print at that size, but you can open up any size that you'll be able to print.


I put on all the elements, I wanted to work with. I loved her little word tags and she has some amazing flowers in this kit that I knew I wanted to print and cut out. You can do one page of elements at this size or do a smaller sheet and do two, just depending on how many you want!

Then, I opened up one more screen at the same size and this time I pulled paper on. I wanted to use my circle and heart punch to cut coordinating shapes. I made the papers smaller (1800 pixels by 1800 pixels) so I could fit more on and have more variation.


I sent these off for printing. I printed them on cardstock. Once I got them back, I cut out everything on the first sheet and then used my punches to make some circles and hearts with the patterned papers. I also bought 4 things of ribbon that coordinated with the colors and a large grape vine wreath. These items cost me $15.00 total, and I spent $2.00 on the printing, so not a bad price for a wreath!

Once, I had everything cut, I punched a hole in everything and attached it to the wreath with the ribbons. I also tied plain ribbon in parts to give it a little more fullness. Here is my final project!


And a really close up view:


I love how this turned out and everytime I leave my house or come home, it just makes me smile! I hope you all try this project, and I'd love to see what you think!

Read more...

Tuesday, April 20, 2010

Turn It Up Tuesdays!!!

Hi all, my name is Trish, and I'm pretty new to Jennifer's awesome team. I've been scrapping for three years now and I know that one of my biggest problems is coming up with ideas. I'll have the kit I want to use, the pictures I want to use, but then I'll just get stuck on a title and journaling. I'll sit here at my computer and go "Hmmmmm...?" Sometimes those come to me once I finish the page or half way through, but sometimes it just doesn't. On occasion I'll be happy to leave it with no title or journaling, but I really prefer my pages to have them. So, when I'm stuck I check out some of these great sites I'm here to share with you.
Things We Forget - great title ideas
Baby Love Letters - awesome prompts for journaling
Dear Lizzy - just an all around great blog for ideas
Creativity Prompt - more ideas for your journaling needs
Garden Quote - Great title ideas in a plethora of subjects
Well, I hope you all get a little inspiration from these links! They help me a lot.
See you all next time,
Trish

Read more...

Monday, April 19, 2010

Meals-In-Minutes Monday


Michelle here again with another Meals-in-Minutes Monday recipe for you! This recipe is just a crockpot full of yummy goodness that truly does not take all day in the crock pot (unless you want it to!). I usually make my kids lunch and then throw everything together for dinner at the same time so that we can enjoy the afternoon together and come home to an already done meal. I admit that I use the high setting on my crockpot almost all the time but I will include cooking times for the low setting as well. The wine in this recipe is just a cup and the alcohol all evaporates during cooking, leaving the flavor only. My kids love this recipe and I hope you will too!

Chicken with White Wine Sauce and Bacon

Ingredients:
1 cup frozen pearl onions
1 - 4 oz can sliced mushrooms, drained
6 slices of bacon
3-4 boneless, skinless chicken breasts, cut into strips or 2 pounds chicken tenderloins
salt & pepper to taste
1 can cream of chicken soup
1 cup white wine
2 tsp italian seasoning
2 tsp minced garlic

Directions:
In crockpot, combine mushrooms and pearl onions.

In a large skillet, fry bacon over medium heat until crispy. Remove bacon and place on paper towel to soak out most of the grease. Set aside as you won't need the bacon again until just before serving. Season cut up chicken with salt & pepper. Cook chicken pieces in bacon fat over med-high heat 3-5 minutes or until browned. Place cooked chicken pieces into slow cooker.

In a medium bowl, whisk together cream of chicken soup, white wine, italian seasoning and garlic. Pour over chicken. Cover and cook on high heat setting for 2-3 hours or on low heat setting for 6-7 hours.

Crumble bacon and put on top of chicken mixture just before serving. We serve this with mashed potatoes and carrots (or any other veggie that I happen to have on hand). There is never ANY left. Enjoy! :)

Read more...

Sunday, April 18, 2010

Sunday Spotlight - Meet Kat!

Hi All! Erin here with today's Sunday Spotlight! We are going to look at one of Jennifer's amazing creative team members - Kat Stokes! I asked her a bunch of questions and here's what she told me :)

1. Your screen name? KatStokes

2. Are you married/have children/pets? Yep. Been married 14 years in May. We have two little boys aged 8 and 2-1/2, one crazy Queensland Healer/Border Collie who is also 14, a 9 year old cat and a multitude of fish that I wish we could get rid of.

3. Snacks...Salty or Sweet? Oh definitely salty!!! Pretzels, Chips & Guac, Artichoke Dip. YUM!!

4. Beverage of choice? Non-Alcoholic would be lemon water. I'd have to say my favorite alcoholic beverage of choice right now would be Jack & Coke.

5. PC or Mac? Unfortunately a PC. Cannot wait until I can afford a Mac.

6. How long have you been digi-scrapping? November November 2002. Please don't ask me to share my first page....hahahaha!

7. How did you get into digi-scrapping? I was looking for inspiration when I paper scrapped and stumbled upon 2Peas. I found their digital section and was completely hooked from then on. I haven't paper scrapped since.

8. What is your favorite kit of Jennifer's? That's a tough one. I think Cuppycakes is at the very top of my list with My Birthday Boy coming in as a close second.

9. Favorite time to scrap? First thing in the morning.

10. What is the most challenging part of scrapbooking for you? Making sure my pages look balanced. Hence the reason I use a lot of templates.

11. What are your favorite movies/TV shows? Don't laugh. I love All My Children. I have been watching it since I was a little girl....a long, long time ago. :) I also love a lot of the reality shows like The Biggest Loser, American Idol, Millionaire Matchmaker, Top Chef as well as Melrose Place and 90210.

12. What is something unique about you? Honestly, I'm not really sure. Can I get back to you on that one whenever I figure it out? :P

Here are some of Kat's favorite layouts using Jennifer's goodies:

A gorgeous 2 page spread using Color Burst:


This beauty using This Woman's Work:


And this fun layout using Cuppycakes:

Read more...

Saturday, April 17, 2010

Photo Tip Saturday-Better Black and Whites

Heya folks, Jen here, and I am so glad that it's Saturday! I can't believe how fast this month is flying by.
Saturday's on the Jennifer Fox Designs blog are reserved for tutorials-two times a month we do photo tips, two times a month scrapping tips. Today I get to bring you some tips about black and white photos.

I am a black and white photo addict. There is something about a great black and white photo that just speaks to my soul. There are several different methods of doing black and white photos and we will cover a few of them today and give tips on how to make your black and whites really pop!

All my screenshots today will be from Photoshop Elements, but these methods also work in Photoshop CS.

Here is the image we will be working with today. This is straight out of camera, no conversions done whatsoever.
Photobucket

Method One: Monotone Color through PSE
PSE has a section under effects entitled monotone color. One click of a button, and you have a black and white photo. This is a nice basic black and white, but its not my favorite.
Photobucket

Method Two: Convert to Black and White
Under the Enhance tab in the top menu in PSE, it gives you the option to convert to black and white.
Photobucket

Converting via this method gives you more control on how your black and white turns out, with several choices as to the style of black and white and intensity sliders. I went with the scenic landscape version since that is what this photo is of, and then tweaked the sliders, and this is the result.
Photobucket

Method Three: Gradient Map
This third method is the hardest to remember at first, but I find gives me the best results and the most control over my black and whites.
Photobucket
Photobucket

I start with adding a levels layer, then add a gradient map in black to white. Just with those two layers, I get a pretty decent black and white straight out.
Photobucket

Watch what happens when I go in and tweak the levels layer slightly, brightening things up and adding more contrast.
Photobucket

It's a subtle difference, but really makes an impact to me.
Photobucket

There is no wrong way to make a black and white photo, and I hope these tips and tricks will help you find a way that you love!
Happy Scrapping!
Jen

Read more...

Friday, April 16, 2010

Friday Freebie!!

Well hello digi world!!! Rae's World here bringing you a cute little freebie. I made a photo frame from Jennifer Fox's Cuppy Cakes. I absolutely love this kit!! So please enjoy the freebie and come back and link us up when you use it! We love seeing your creations!!


Click HERE to download!!

Read more...

Thursday, April 15, 2010

I am not a blogger (Tidbit Thursday)

Really, I'm not. This isn't something I look forward to doing. My husband thinks that I'd be a natural at this blogging thing, yet it instills a fear into my heart like no other...except maybe public speaking and losing my children or husband. So if I'm so petrified of blogging, why is he convinced that it's something I could and should be doing and doing well?

Well my fair readers, I am a journaler, a writer at the heart of it. I'm not an artist, I never even liked to color. I love to tell a story though, any story. It's in my blood, it's so embedded in me to tell stories that I can't avoid doing it. Just ask my husband...I never shut up! In my scrapbooking, I've found a viable outlet for those stories. For the tales of my life, what makes me...me.

There are moments though, like this afternoon, where I wish I didn't feel a compulsion to tell the story. I sat here at my laptop and typed up some journaling that had me bawling. We're talking box-of-tissues-the-doorbell-better-not-ring-because-I'm-a-blubbering-mess sort of journaling.

I tweeted that my journaling had my in tears and got a couple responses about how they'd be there too. One response had me thinking about what I was doing though. I'll paraphrase the response for you:
When your authentic feelings hit the page. It is cause for celebrating those tears. They are who you are.
Pretty profound, eh? Well, I thought so. And that brings me to my point for this post. We are the story. Those feelings, those tears, those smiles, frustrations, laughs...they are us. Embrace that and know you're doing something wonderful for yourself and your loved ones.

Until next time!

Leila

Read more...

New Release Day!

Well, in this case, Re-Release Day! Jennifer is releasing a couple of older kits for the very first time at The DigiChick! Check them out today while they're on sale for 20% off!

Read more...

Wednesday, April 14, 2010

Fun birthday cards

Hi JFD friends!! Donna here again, so sorry I am late sharing my hybrid project with you today... internet is really wonky today... anyways, here it is :)

I first had this idea with My Birthday Boy kit..
Super easy and a lot of fun! Had a blast making these..


So, when I saw the hats in Cuppycakes...

I knew I had to make the girly version :D

First off, arrange the elements in a blank document. I only resized the birthday hats just a bit. Everything I used for my cards were in one A4 sized document.
Print and cut the images. Then trace the hat images onto another blank cardstock.

Secure with a small brad
Embellish with another cutout. I adhered the button cutout with a glue dot.

and here are the 3 finished cards... all were from the kit except the brads and that little white bow ;)

for an extra finishing touch, decorate the inside too...

Hope you liked my project, try it! :)
Happy crafting!

Read more...

Tuesday, April 13, 2010

Turn it up Tuesday!

Hello there, Jenna here again to bring you this week's Turn it up Tuesday, YES! I'm always out looking for nifty programs, plugins or actions that will add either pizazz to my photos and/or improve just the overall image of a photo subject. No, I'm not talking about adding an instant facelift, but who wouldn't want to, right? LOL....well maybe, but that is besides the point...what I'm referring to is like getting rid of blemishes, wrinkles, dark circles, etc Yea, I know there is the spot healing tool, as well as, the clone brush which in conjunction can create the perfect effect you may want quickly, but this is what I cam across the other night and far more reasonable than other programs/plugins such as OnONE, etc

I’m planning on taking advantage of the trial offer and see for myself. Here is some info on it from the Portrait Professional website:

  • New ultra natural ClearSkin®
    skin improving technology
  • New intelligent touch up brush
  • Multi-processor support
  • New support for profile shots
  • Now also available as a
    Photoshop plug-in
  • Many other enhancements
With Portrait Professional, it’s incredibly fast and easy for any photographer to enhance all aspects of the face and hair of the subject:
  • Fix skin blemishes such as spots or pimples in a fraction of the time that conventional touch up software would require
  • Reduce and/or remove wrinkles
  • Remove grease, sweat or unsightly shine from the skin
  • Subtly reshape all or any aspect of the face to reduce the apparent weight of the subject or make the face subtly more attractive
  • Enhance the eye and mouth shape color and sharpness
  • Automatically smooth, recolor and thicken the subject’s hair
  • Adjust the lighting on the face to make it more flattering or remove shadows from hats
This is powerful technology that you do not have to fight with, as it requires no specialist skill or knowledge to bring out the beauty in your portraits.

Portrait Professional 9. The ultimate fast, easy retouching software.

Portrait Professional CD-ROM case Make your subjects as beautiful as they can be.
Download the Free Trial and see for yourself what it can do.
Portrait Professional 9 is new portrait airbrushing software that has been "trained" in human beauty. Exceptionally fast and easy to use, and capable of the highest quality touch up, it lets you improve your photos instantly, just by moving sliders.
With Portrait Professional, it's incredibly fast and easy for any photographer to enhance all aspects of the face and hair of the subject:
  • Fix skin blemishes such as spots or pimples in a fraction of the time that conventional touch up software would require
  • Reduce and/or remove wrinkles
  • Remove grease, sweat or unsightly shine from the skin
  • Subtly reshape all or any aspect of the face to reduce the apparent weight of the subject or make the face more attractive
  • Enhance the eye and mouth shape color and sharpness
  • Automatically smooth, recolor and thicken the subject's hair
  • Adjust the lighting on the face to make it more flattering or remove shadows from hats
This is powerful technology that you do not have to fight with, as it requires no specialist skill or knowledge to bring out the beauty in your portraits.
Need convincing? Download your free trial photo editing software now and see for yourself.

How does Portrait Professional's automatic touch-up work?

Portrait Professional has been trained in human appearance. The software was shown hundreds of photographs of human faces, and sophisticated mathematical techniques were used to create a knowledge base of human appearance and beauty.
The result is software that actually "knows" what sort of changes will make any particular face more attractive, which in turn makes it fast and easy for any photographer achieve natural and beautiful face enhancement.
All you have to do is choose how much to enhance the skin texture, smoothing and reducing wrinkles and spots, and how much you want to subtly re-sculpt the subject's face to make it look slimmer or more youthful.
Portrait Professional really is capable of letting any photographer give their portraits a top class makeover in literally minutes. The software really can make your portraits or your brides look as good as a celebrity in a magazine.

Why not use Photoshop as your portrait touch-up software?

It is true that most of these improvements can be made using traditional photo editing software such as Photoshop. However, it would take a skilled touch-up artist many hours to perform the tricky manual airbrush and touch-up operations that would be necessary.
Portrait Professional allows unskilled users to get sophisticated fully professional touch-up in minutes. For the first time portrait photo software for all!
Even experienced Photoshop users have been impressed at the speed with which they can get a totally natural looking airbrushed touch-up, just by moving sliders.
And less skilled Photoshop users would quite simply be unable to get as good a photo touch-up however many hours they spent.
Just because Portrait Professional is easy to use, does not mean it limits your ability to airbrush your portraits just how you want them. The difference is that where in Photoshop you would need years of experience and considerable skill, Portrait Professional is fast, easy and intuitive and can be mastered in a few hours.
By the review, it appears to be simple, you can be the judge: You can check it out at : http://www.portraitprofessional.com/.

Read more...
Related Posts with Thumbnails

Disclaimer

As a creative team member for several digital scrapbook designers, I have received their products for free in return for creating and posting projects (digital layouts, hybrids projects, etc). Many of the layouts you see here were done in conjunction with requirements for these creative teams. Please be advised that the products used were indeed received for free.
The Daily Scrapper - Topsites Best Scrapbooking Sites, Digital Scrapbooking, Scrapbook Supplies, Reviews, Awards
List of the Best Digital Scrapbooking Websites by Scrapbook MAX!SCRAPBOOKING TOP 500 The Daily Scrapper - Topsites Free Digital Scrapbooking

  © Blogger templates Newspaper III by Ourblogtemplates.com 2008

Back to TOP