Saturday School: Tool Time
Hi Everyone! It's Jenn (jk703) here with your Saturday School: Tool Time! We covered the Move Tool last time, and today we will be looking at the Marquee Tool! A very versatile tool! Let's get right to it!
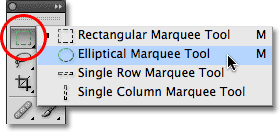
First, the marquee tool is on the tool bar and looks like this:

The Marquee Tool can be accessed by the shortcut Command + M or Control + M. At the most basic function, the Marquee tool is used for cutting, cropping and copying selections. As in the image above, there are 4 different ways to make selections: Rectangular, Elliptical, Single Ron or Single Column. The single Column or Single Row measurement is in pixels. Right now, you think you can only create selections using Rectangles and Ovals! Wait... we can fix that!
In your Photoshop Preferences selections menu, check off the Use Shift Key for Tool Switch option. This will allow you to create squares and perfect circles. When making your selection using the Rectangular Marquee, and holding down the shift, you will create a square selection. the same goes for the Elliptical marquee and circles.

There are times when you make a selection, and realize that it is not in the right location. Do you know how to move the selection? Here is how; hold dowm the space bar, and then begin to drag your mouse. Your selection will move and not re-size.
Now I will go over the marquee Options Toolbar. This will give you some knowledge of what all those little icons up on the top mean! And you thought they were decoration! HA! The toolbar option looks like this:

This bar allows you to make changes to the Marquee tool you are using, whether Rectangular or Elliptical. Those for funny square type shapes have meanings too! The first is called the New Selection Button. this allows you to make a new selection and delete the current selection.

The second small button is called the Add To Button. This option allows you to add to an existing selection. When you are making an additional selection you can also get to the Add On Option by pressing and holding the shift key while you are making the new added selection.

Subtracting from a selection is able to be completed by choosing the 3rd small button, and works in the same was as the Adding to the selection button. This button can be used by pressing the Alt Key on your keyboard, or for a Mac, the Option Key, and again this must be while you are making your selection.

Last but not least is the Intersection Button. This option can be used when you want to have an intersection area within the existing selections. By pressing and holding the Shift and Alt together (Shift and Option for Mac) you can do this while making your selection!
That is a lot to see and understand... So, I am blogging again on Tuesday the 12th.... I will be showing you how to make your own Vignette using the Marquee Tool! Woot!
Have a great day everyone and thanks for stopping by! I hope you come back for a visit on tuesday too!
Jenn (jk703)


0 comments:
Post a Comment