Wednesday, March 30, 2011

Desktop Freebie!

Hey Scrappers, Lori here with your Desktop Freebie for April. Where has the time gone? I can't believe we are almost through with March already. Without further delay, let me present you with April's Desktop freebie... I created the desktop using Jen's kit This Woman's Work. This kit has so many springy colors and some truly beautiful elements. If you haven' t picked this kit up already, you need to!!


I hope you all enjoy the freebie and thanks for dropping by the blog! Have a wonderful rest of the week!!

Read more...

Monday, March 28, 2011

Meals In Minutes Monday 3/28/11

Good morning bloggers, Kara here with another delicious meal for you.

Chicken Parmesan Bundle.

Prep Time 35 mins
Total Time: 1 Hr. 5mins
Total Servings 6

What You'll Need:
4 oz (1/2 of 8oz) PHILADELPHIA cream cheese, softened
1 pkg (10 oz) frozen chopped spinach thawed, well drained.
1- 1/4 cups Kraft Shredded Mozzarella cheese, divied
1- 1/4 cups Kraft grated Parmesan cheese divided
6 small boneless, skinless chicken breasts (1-1/2 lb) pounded to 1/4 inch thickness
1 egg
10 RITZ crackers crushed
1 1/2 cups spaghetti sauce heated

Mix: Cream Cheese, Spinach, 1 cup mozzarella cheese, and 3 TBSP of Parmesan cheese until well blended; spread onto chicken breasts. starting at one short end of chicken breast roll up chicken tightly, secure with toothpicks if desired.

Beat egg in shallow dish mix remaining Parmesan cheese and cracker crumbs in separate shallow dish. Dip chicken in egg, then roll chicken in crumb mixture until evenly coated. Place seam side down in 13x9 baking dish sprayed with cooking spray.

Bake 30 minutes or until chicken is done (165) Remove and discard toothpicks if used. Top chicken with spaghetti sauce and remaining mozzarella cheese. ENJOY!

There you go, I hope you enjoy today's MIM, and like always if you try this yummy recipe, stop back, share a picture and tell us how you liked it. Have a great day!

Kara

Read more...

Saturday, March 26, 2011

Saturday School: Option to Edit & Organize - Photo Software

Hi Everyone!  It's Jenn (jk703) here to share some information with you today for saturday School!  We are going to go over some software options that are available for photo editing and organization!

I know... you are looking at your scrapbooking stash and wondering if there is something out there to help you find things, sort images, and edit images, making it all pretty and tidy, right?! I bet you even started digital scrapbooking, and thought "This is going to be so much more organized than paper scrapping!"  Right!?!  HA!  Now, you've probably been scrapping for a bit, have a gigantic un-countable amount of un-edited photos and then on top of that an amazing stash of digi supplies!

What to do? What to do?  Well.... I'm going to share some software that either is for photo organization, photo editing or has the capabilities included. Depending on your type of computer, budget and what options you are looking for - there is something for everyone!

 Picasa is by Google.  It is a free download that will allow you a simple way to organize your photos.  This option also allows for simple photo editing, such as lighting and color issues. They offer batch uploading, and also allows you to see the photo properties.  You can see what settings you had on the camera when you took a certain photo. They support tagging, search filters, and color searches.


Adobe Photoshop Elements is not just for creating, but can be used for the organization of your photos and supplies. This is available on all Windows versions of PSE, and then only on
PSE 9 for Mac versions. The organizer lets you organize your photos with keyword tags, then search and share them.  Quick fix allows you to crop, fix red eye, and sharpen  - but there is much more.  Cost can be from $50 to $100.
Adobe Bridge comes with the certain Adobe programs or Creative Suites.  It offers a folder based system of organization.  This software would streamline your photo editing, creative workflow, and actually using your photos because it works directly with Photoshop.  Allows sorting, filters, batching, color labels, star ratings, and some drag and drop features.  Cost:  Software comes with certain Adobe software, so the price can vary. 
Acdsee is an easy to use photo organizer, editor, and sharing machine.  Browse, organize, and manage all your photos and supplies in one location.  Create your own categories, keywords, key phrases, and much more.  There are also editing tools included, such as exposure correction, red eye fix, and it also includes some creative effects. Cost:  $70 - $170.00 depending on the version. 


Adobe Photoshop Lightroom is more of a photo editing software than an organizer.  It isn't a file browser like Adobe Bridge, but more of an image management system with heavy duty photo editing. The organization part of Lightroom reminds me of the Photoshop Elements Organizer.  You can use keywords, and locate things by color, or type.  Cost:  $250-$300. 

iPhoto is a software that is included in iLife, on Apple computers. This just happens to be how I ended up organizing.  The software allows for events, merging, separation as well as keywords, smart albums and search functions.  You can create separate photo libraries, such as one for photos and one for digital scrap supplies.  This software has really basic photo editing options.  Cost:  $49 - $79, to purchase iLife software.

Have a great Saturday everyone!
Jenn (jk703/TheTypativeScrapper)

Read more...

Friday, March 25, 2011

New Release Friday and some WINNERS!

Hey Scrappers! Lori here to present this weeks New Releases (and some winners too)!

As you know Jennifer teamed up with the fabulous Christy Lyle to create two awesome collabs!

First up we have Birthday Bash - Girl :


Next we have the equally fabulous Birthday Bash - Boy:


Also both of these kits are available in a money saving bundle. Check it out here.

Finally we have some of Jen's super awesome templates! Her templates are super easy to use, and make every layout beautiful, and easy to create!


Oh I almost forgot!! We need some winners for these awesome new goodies!!

Chosen by Random.org,

Congratulations to

Blogger Justine McD. said...


Adorable! My daughters 2nd birthday is 2 weeks away this would be perfect.
My most memorable birthday...hmmm I guess my 18th. I had a bunch of friends over and it was hubby and I's first 'date' too <3>


March 24, 2011 6:55 PM

You win your choice of either one of the Birthday Bash Kits, PM Jennifer at 9th&B and let her know which one you would like!
Also Congratulations to
Daydreamer, March 18, 2011 1:10 AM
Funny how you want a birthday story. My son is going to be 5 in December and he is already planning his birthday party. Has the cake he wants already picked out. lol... Thanks for the chance. :) Great preview

You win Jennifer's new Scraps to Go Vol. 12!! PM Jennifer at 9th&B to collect your prize!!


Thanks again to everyone who entered!


I have some awesome news for one lucky blog reader! Remember our fabulous Win It Wednesday Giveaway from Delightful Designs??? Check this out:


How exciting! Congrats, Holly!!!

Finally, stop by 9th&Bloom today for an awesome Speed Scrap, hosted by Art Crew Member Caroline!


We hope you all have a fabulous Friday and a wonderful weekend!

Read more...

Thursday, March 24, 2011

First Look and Win it Now!!


Jennifer has teamed up with the amazing Christy Lyle to bring you two {yes I said two} collabs!! They are both super cute and I think they might be my new favorites! Do you want to win one of these before you can buy it? Just leave a comment here telling me about your most memorable birthday to be entered for a chance to win!

Would you like an extra chance (or chances!) to win? Simply do one or more of the following and be sure to leave each entry in a separate comment for more chances.

1. Follow this blog and Christy's Blog.
2. Become a fan of Jennifer Fox Designs on Facebook.
3. Subscribe to Jen's newsletter.
4. Follow jfoxdesigns on Twitter.
5. Become a fan of Christy Lyle Designs on Facebook.
6. Post about this giveaway on your Facebook page and/or tweet about this giveaway on Twitter.

You can get up to 7 entries to win this fabulous kit!!! How fun! This giveaway will close at MIDNIGHT EST on tonight (March 24). Be sure to check back tomorrow to see if you've won. Good luck!

***If you already commented last week when Jennifer made an "oops" and posted too early, those comments will be counted also.***

Read more...

Tuesday, March 22, 2011

3/22 Tidbit Tuesday


Happy Tuesday bloggers! Kara here with your Tidbit Tuesday. I have a friend on Facebook who makes these really nice bracelets and sells them. I won one at one time and I have been hooked. She goes by Cathy's Creations  She has bracelets for all kinds of reasons, for all kinds of causes, to support troops, and so on. Shipping is super fast, and Cathy is super sweet. Head on over to her page on FB, like her and let her know I sent you. You won't be disappointed!! Have a great day :)

Read more...

Monday, March 21, 2011

Mushroom Cubed Steakes

Good morning everyone, and Happy Spring!! I know if your weather is anything like my Ohio weather then today will be nice and warm and the rest of the week it's going to be cool and rain, and probably that S word. I'm just ready for sunshine!! Anyway, today I bring you a recipe that I kind of created myself. Here is what you will need.


Couple cans of Cream of Mushroom soup
4-6 Cubed Steaks
Salt & Pepper

Salt and pepper both sides of the steaks, add to your slow cooker, add mushroom soup to the steaks, add some water, just enough to cover the steaks. Cook on low for 6-8 hours or on high for 4 hours. I always serve with mashed potatoes and veggies. And I use the mushroom soup as gravy. The steaks come out nice and tender. Here is my hubby's plate from the other night, I say he really likes it..lol

I hope you all enjoy this yummy recipe, and if you try it be sure to stop back here and let us know. Have a happy Monday all!
Kara/

Read more...

Sunday, March 20, 2011

Scissors Sunday: Faux Stitching

Happy Scissors Sunday everyone!  Jackie here with a little tidbit about how to get that stitched look to your hybrid projects without ever having to lift a needle or thread.  I use it on occasion and I like the way it looks.

I created this card using Jennifer's "My Birthday Boy" kit which is available at 9th and Bloom.  For the lighter tan colored strip, I used Jennifer's "My Best Friend" kit.  After I printed off the papers and cut them out, I added some white stitching with a white craft marker.  You can use any color marker you'd like, of course!  I did it completely free hand, but you could use a ruler to keep your lines straight if you want.


A closer view (as you can see they aren't perfect, but I feel it gives a little bit more personality to the card!):
Full credits:
My Birthday Boy, My Best Friend - Jennifer Fox Designs
Stickles, Ribbon from Michaels, Button from Paper Trey Ink, Adhesive
SSSC109

Thanks for stopping by today! 

Read more...

Saturday, March 19, 2011

Saturday School - Printing Layouts

Happy Saturday everyone! Terra here with another Saturday School topic for you. Now that I have created quite a few layouts I have started to research my options for printing. Once you decide the size you want to print (often 12"x12" or 8"x8"), there are generally two options - printing professionally bound photo books or printing single pages and adding them to an album.


Photo books are great for a commemorating a special event or if you are a chronological scrapbooker. I know I would love to create a wedding photo book and a book to celebrate my baby's first year, just to name a few! But for the most part, I am not a chronological scrapbooker so photo books intimidate me and I have been looking for other solutions.

I really like the idea of creating albums similar to the albums that traditional scrapbookers create. They look very durable as printed pages are protected by page protectors and pages can be reorganized whenever necessary. There are a variety of albums on the market with different covers and binding options to suit anyone's needs. There are traditional D-ring binder albums that are simple to use if you add/remove pages frequently. Expandable post-bound albums can be more time consuming to add/remove pages because you have to take the album completely apart to reorganize pages. I have heard that you can make this process easier by replacing the metal posts with a product called snaploads.
Classic 12x12 D-ring binder from We R Memory Keepers

As for vendors, I have heard a lot of good things about Persnickety Prints. I honestly can't remember hearing anything negative about their quality or service. They offer single prints, photo books, calendars and more.They currently have a deal on Facebook for 25% off of 12x12 prints. But hurry, the deal is only available to the first 300 customers.

Of course you may remember that Jennifer did a review on Lulu photo books a little while ago. If you missed it, you can check out her review here. Jennifer was very impressed with her photo book and gave them a great review.


Page from Jennifer's Lulu Photo Book

Shutterfly is another great option for either photo books or prints and if you take the time to look for deals you can often find a coupon on the web for a low priced photo book.

I hope that you have enjoyed this Saturday School post. Let me know what you thought of it in the comments. Do you print photo books or single pages? Have you used other vendors for printing your layouts?

Read more...

Friday, March 18, 2011

Oopsie!!! (But here's a treat...)

It turns out that yesterday's sneak peek and win it before you can buy it post were a bit premature. Don't worry, I'm going to hold onto your comments, but the kit won't hit the store until NEXT Friday. Phew! We'll try the whole peek and win it again next Thursday, so stay tuned.

In the meantime, because of my goof, please enjoy 30% off any purchase at my shop at 9th&Bloom now through Wednesday, March 23. Simply use the code jfd_oopsGoOf at checkout to receive 30% off your total order. Enjoy!

Read more...

Thursday, March 17, 2011

First Look & Win It Now!

Jennifer and a mystery collab partner have two fantastic kits coming to her store tomorrow! If I actually had a clue what awesomeness Jennifer had up her sleeve or who she is collabing with I could tell you all about it. Yet, Jennifer is really sneaky and only a select few know who she's working with and what they're up to. Evil isn't it? I can say however is that it has one awesome girl cupcake and the kits have a birthday boy/girl theme. Cool, huh?

Would you like to win one of these kits before they ever hit the store? Simply leave a comment here telling me something about a birthday and I'll enter you into a drawing to win these kits!

**Post interrupted by Jennifer to show you a little peek. Shhhh...our CTs haven't even seen this yet!**


Photobucket


Would you like an extra chance (or chances!) to win? Simply do one or more of the following and be sure to leave each entry in a separate comment for more chances.

1. Follow this blog and Christy's Blog.
2. Become a fan of Jennifer Fox Designs on Facebook.
3. Subscribe to Jen's newsletter.
4. Follow jfoxdesigns on Twitter.
5. Become a fan of Christy Lyle Designs on Facebook.
6. Post about this giveaway on your Facebook page and/or tweet about this giveaway on Twitter.

You can get up to 7 entries to win this fabulous kit!!! How fun! This giveaway will close at MIDNIGHT EST on tonight (March 17). Be sure to check back tomorrow to see if you've won. Good luck!

Read more...

Wednesday, March 16, 2011

Template Pack Giveaway!

Happy Wednesday digi-scrappers!  Trina here with fantastic news for any day of the week, but especially a "Hump-Day."  Do you like templates?  I hope so, because the JFD CT has created a 6-pack of templates, free to you just for being a fan of Jennifer Fox Designs!

Here is a preview of the freebie:

Download TIFF format - 4Shared  OR  Mediafire
Download PSD format - 4Shared  OR  Mediafire

Read more...

Tuesday, March 15, 2011

Tidbit Tuesday - Candles

Hey Scrappers, Lori here with your Tidbit Tuesday. I don't know about you, but I LOVE candles! This past weekend I went to the Yankee Candle store. If you have one of these near you, you HAVE to check it out, and if you don't, you can always shop online! They have what seems like a million different scents, and well honestly they do them so well. I personally hate candles with "fake" scents (apple, strawberry, rose) most candle companies just don't do them justice. But when you smell a Yankee candle it actually smells like the item. My husband bought a Macintosh Apple car freshener. It really smells like apple. I have been an avid shopper at Yankee Candle for years, but this time when we went, the cashier asked me if I had signed up for their email coupons. I hadn't.. So she gave me a little card, to sign up. I went to www.yankeecandle.com/coupons. Signed up for their email coupons, and I instantly got a coupon for $10.00 off my next $25.00 purchase. What an awesome deal!

Read more...

Monday, March 14, 2011

Meals In Minutes Monday- Chicken Strips!

Good Monday morning all, Kara here with another yummy recipe that I hope you'll enjoy. Homemade Chicken Strips, here is what you'll need.

6-8(depending on family size) Boneless skinless chicken breasts
1 cup corn flakes crushed
1 teaspoon salt
1/2 teaspoon pepper
1/2 cup melted butter

In a side dish mix corn flakes, salt and pepper. Cut chicken into 1 inch thick chunks, dip chicken into butter and then roll in the corn flake batter until completely covered. Arrange chicken in a single layer foil lined baking dish, bake at 400 degrees for 30 minutes. Serve hot or cold with your favorite dipping sauce.

There you go! Something quick and easy, and a real winner and my house. Hope you enjoy, and have a great day!

Read more...

Sunday, March 13, 2011

Scissors Sunday: Card Inspiration

Hi all, Sarah here. I know I talked about PageMaps CardMaps sketches a couple of months ago but I wanted to mention it again because there is a new set of sketches available for March (not to mention the announcement of a release of a CardMaps book..sooo exciting). I totally love using these sketches for my hybrid inspiration and this month's sketches were no different. Here's a card I made using Jennifer's This Woman's Work and one of the March CardMaps sketches.


This card is a little more complicated and took a little more time than I would normally spend on a card but I think it was totally worth it. I love the way the heart border looks and the stacked flowers are so fun. the only thing I would change about this card is that I wish I had a little bling to put in the middle of the flower but that can easily be added before I'm ready to give the card away.

I find sketches to be a wonderful way to get a little hybrid inspiration going. I'm so glad there are so many great resources available and I'm happy I was able to share one of my favorites with you today.

Read more...

Saturday, March 12, 2011

Alpha Outline: How To

Hi Everyone!  Hope you are having a great Saturday!  It's Jenn (jk703) here to share a little tutorial to add a little something to all those fonts you use on your layouts!  I'm sure many of you are fontaholics just like me!

Many times on a layout, I will use an alpha for a main word in my title, and then use a font the other words that are in the title.  BUT, there are also times when I just use fonts for my whole title.  Outlining the font gives it a little oomph and makes it stand out a little.  It can look like a sticker, or just give the font an different look.

For my example, I am using He's My Brother kit, and the font is called Smiley Monster, a free scrapbooking font by Kevin and Amanda.  An awesome color palette, and lots of fun embellishments!


Ok... let's get started!  You should have a layout open in PS or PSE.

Using the Type Tool, choose your font, and type in your title or the words that you will be outlining.

Double check the font, spelling, and placement to make sure it is how you want it to look.

Next, you will right click on the Type Layer in the Layers Palette.  Choose Rasterize layer or Simplify Layer, depending on your program.


In the File Menu, click on Edit > Stroke, and the Stroke menu will pop up.

I usually use anywhere between 2 and 8 pixels.  If you want a larger stroke outline, you can always adjust the distance between letters to allow for more space. 


Another way to change it up is to play with the stroke color, with different colors used to match my layout. In the Stroke menu, the Color box is clickable, and the Select Color Menu will pop up so you can choose any color you want.


Remember, you can play with all the settings here, to see what pops up.  If you don't like what you did, click to undo!  I first tried a brown outline as seen here.

Next, I tried teal, and last I tried White.  White on white is nice, just add a shadow to really show off the edges as if it was a sticker.


There you have it... a nice outline to my title with a font!  It looks like a sticker with the edge, and then the added shadow gives it some depth!  Hope you enjoyed the tutorial!  Thanks for visiting!

Enjoy the rest of your weekend!
Jenn (aka jk703 or The Typative Scrapper)

Read more...

Wednesday, March 9, 2011

Win It Wednesday: From Etsy--Delightful Designs

Hello, everyone! I'm so excited to bring you our big Win It Wednesday for March. Last month, I gave away a fabulous prize package from Corynne's Creations, and I know our winner was so thrilled! This month, I came across the amazing Andrea of Delightful Designs and she was sweet enough to offer a fabulous prize for one of you.


Andrea is a mother of 2 and a proud military wife. She started making tutus for her daughter and her Etsy shop took off from there. Everything she sells is made to order--isn't that awesome?


Delightful Designs offers so many pretty things. I'm in love with the tutus. They are just gorgeous and I love that they're made to order. This Rainbow Apron Style Tutu is amazing. This tutu is perfect for birthdays or just playing in. It is super fluffy, made with yards and yards of soft tulle. Apron style tutus simply tie around the waist and include a flower clip to attach to the center of the bow or to put in your girl's hair.


How adorable would your little love look in the hot pink and yellow apron style tutu? Simply tie it around her waist and attach the flower clip if you choose to! This set also comes with a crochet headband and 2 flower clips. So adorable! All tutu waistbands are made with half elastic, half material to allow for stretching to fit and grow with your little princess, unless otherwise noted in the product description.

I also love the hair accessories at Delightful Designs. These crochet headbands measure 1.5 inches. Add a flower clip and it is the perfect addition to any outfit!


These flower clippies are so cute and are perfect on the headbands. These daisy flowers come with and alligator clip attached to the back.


Did I mention legwarmers? Oh my goodness, I LOVE legwarmers. These super cute legwarmers have multi-colored polka dots and come with a coordinating headband with a removeable flower clip.


There are so many more fabulous finds at Delightful Designs. Take a look at her Etsy shop and start thinking of what you'd love to have, because she is letting me give away the most amazing prize package. One lucky winner will win a tutu set, including tutu, crochet headband with removeable flower clip, and matching legwarmers. It is super simple to enter! All you have to do is leave a comment here telling me what you would do with this prize from Delightful Designs.

Would you like an extra chance (or chances!) to win? Simply do one or more of the following and be sure to leave each entry in a separate comment for more chances.

1. Follow this blog and the Delightful Designs blog.
2. Become a fan of Jennifer Fox Designs on Facebook.
3. Become a fan of Delightful Designs on Facebook.
4. Subscribe to my newsletter. (Link at top of blog)
5. Follow jfoxdesigns on Twitter.
6. Post about this giveaway on your Facebook page and/or tweet about this giveaway on Twitter.

You can get up to 7 entries to win this fabulous prize package from Delightful Designs. How fun! This giveaway will close at MIDNIGHT EST on MARCH 23rd. Be sure to check back then to see if you've won. Good luck!

Image and video hosting by TinyPic

ps) Andrea wants to give my blog readers a very special offer: an exclusive coupon only for you! This coupon is for 25% off anything in her Etsy shop. Simply use the coupon code JUST4JENSFANS and to receive your discount at checkout. Enjoy!

Read more...
Tuesday, March 8, 2011

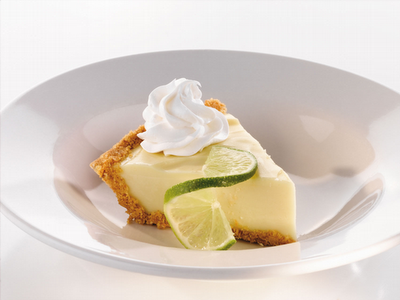
Tidbit Tuesday - Recipe for Key Lime Pie

I'm starting to plan my menu for St. Patrick's Day next week and was trying to think of a green dessert. I remembered seeing a Key Lime Pie recipe on Oprah a couple years ago so I decided to look it up and was happy to find the recipe on her website. So in case you are starting to think of what to eat on St. Patrick's Day, I thought I would share the recipe for Mar-a-Lago Key Lime Pie with you today.

Mar-a-Lago Key Lime Pie

Servings: Serves 8

Ingredients
  • 3/4 pound graham crackers
  • 4 Tbsp. granulated sugar
  • 2 sticks melted butter
  • 1/4 tsp. sea salt
  • 4 egg yolks
  • 1 can (14 ounces) condensed milk
  • 2/3 cup fresh Key lime juice
  • 1 lime , grated zest
  • 1 cup heavy or whipping cream , chilled
  • 2 Tbsp. confectioners' sugar
  • 1/2 tsp. vanilla extract

Directions

To make graham cracker crust: Preheat the oven to 325°.

Break up the graham crackers, place in a food processor and process to crumbs. Add the melted butter, sugar and salt and pulse until combined. Press the mixture into the bottom of a 9-inch pie pan, forming an even layer on the bottom, sides and edge. Bake the crust for 10 minutes. Remove from the oven and allow the crust to cool.

To make filling: While the crust is resting, in an electric mixer with the wire whisk attachment, whip the egg yolks and lime zest at high speed until fluffy, or 5 to 6 minutes. Gradually add the condensed milk and continue to whip until thick, 3 to 4 minutes longer. Lower the mixer speed and slowly add the lime juice until incorporated.

Pour the mixture into the crust and bake for 15 minutes, or until the filling has just set. Cool on a wire rack, and then refrigerate for 20 minutes.

To make topping: Whip the cream, confectioners' sugar and vanilla until nearly stiff. Evenly spread the whipped cream on top of the pie, and place in the freezer for 20 minutes prior to serving.

Read more...

Spring Cleaning and More

Recently, with the warmer weather, I've been really dying to reorganize, redecorate, and just refresh my home. It's not quite warm enough for planting flowers and my garden, so I'm really focusing on inside my house. For a while now, we've been thinking of redoing our entire TV/entertainment center thingie, and I've been spending ages checking out new LCD TV Stands. It's so much fun to browse through this shop and check out new ideas for sprucing up my living room! If you're doing some refreshing at home, tell me about it! And if you have any cool ideas for TV/entertainment areas, let me know!

Read more...

Monday, March 7, 2011

Monday Meals in Minutes

Hey Scrappers! Lori here with your Monday Meals in Minutes. I don't know about you, but Monday's at our house are simply crazy! So I need a meal that I can get on the table fast, but that I don't have to baby sit too much either.


Today I am going to share with you one of our favorites...

Spaghetti Pie

Ingredients:

  • 6 ounces spaghetti
  • 2 tablespoons margarine
  • 1/3 cup grated parmesan cheese
  • 2 eggs (well beaten)
  • 1 cup cottage cheese (I use fat free)
  • 1 lb lean ground beef
  • 1/2 cup chopped onion
  • 1/4 cup green pepper (optional, chopped)
  • 1 (8 ounce) can diced tomatoes
  • 6 ounces tomato paste
  • 1 teaspoon sugar
  • 1 teaspoon oregano
  • 1 teaspoon tarragon
  • 1/2 teaspoon garlic
  • 1/2 cup mozzarella cheese

  • Instructions:

  • Preheat oven to 350 Degrees
  • Cook spaghetti as directed on package
  • While spaghetti is cooking, brown the ground beef, add onion, green peppers. Drain any excess fat
  • Add diced tomatoes, tomato paste, sugar, oregano and garlic
  • When spaghetti is done, drain and add margarine, parmesean cheese and eggs
  • Mix well
  • Spray a 9x13 pan with non stick spray and then line the pan with the spaghetti mixture
  • Spread cottage cheese over spaghetti
  • Spread meat sauce over spaghetti and cottage cheese
  • Bake in oven at 350 for 20 minutes. Add mozzarella cheese and bake 5 more minutes.
  • Serve with garlic bread, and salad.
  • Makes 6-8 servings.
  • Enjoy!!
  • Read more...

    Sunday, March 6, 2011

    Hybrid Highlight~

    Angie here bringing you a little hybrid goodness this week! I was trying to think of what I could do and decided on making a cute little bookmark. Since I retired, I have gone back to reading more, but I have been using a business card as my bookmark. So I decided to use Jennifer's Memory Keeper kit because I loved the colors and figured it would be perfect for a bookmark. I made it 2x6 inches and it turned out to be the perfect size. So if you are looking for a little teacher gift gift or jut something to say "hi" this is a great way to do it!


    Read more...
    Related Posts with Thumbnails

    Disclaimer

    As a creative team member for several digital scrapbook designers, I have received their products for free in return for creating and posting projects (digital layouts, hybrids projects, etc). Many of the layouts you see here were done in conjunction with requirements for these creative teams. Please be advised that the products used were indeed received for free.
    The Daily Scrapper - Topsites Best Scrapbooking Sites, Digital Scrapbooking, Scrapbook Supplies, Reviews, Awards
    List of the Best Digital Scrapbooking Websites by Scrapbook MAX!SCRAPBOOKING TOP 500 The Daily Scrapper - Topsites Free Digital Scrapbooking

      © Blogger templates Newspaper III by Ourblogtemplates.com 2008

    Back to TOP