Tool Time: Crop and Slice
Hi Everyone! I hope you are having a great weekend! It's Jenn, jk703, here to share a bit more information about the tools we use in Photoshop! We are going to look at the Crop Tool and it's alter function: Slicing! So... Lets get started!
Croptastic Cropping!
So what does this do? Well, many times when you start a project, you will use the Crop Tool; this allows you to crop unwanted parts of a photo, paper or other item. The Slice tool is able to let you slice your project into parts, and upload each slice as a different image!
The Crop Tool is pretty straight forward. First, you click on your image in one of the corners, and hold down the left button on your mouse.
Drag the mouse in the direction you want to expand to, the general picture you want it to end up when cropped.
Un-click, and you will have a darkened selection, and then a brighter section. The darkened section is the part of your image that will be cropped off. The portion of the image inside the box is what you image will look like.
Move and fix the cropped image as you need, and click on the checkmark to commit to the new cropped selection. You can also press Enter to commit to the crop too!
Here is my son, hugging a pumpkin... and I am just cropping all the extra space! You can see the bounding box, and the squares inside that bounding box. Those squares or grid represent the Phots Grid, which allows you to play on the Rule of Thirds! (Check back here Tuesday for some information on that!!!).
Once I clicked on the checkmark, I have cropped my photo to the smaller, brighter selection.
Some tips about The Crop Tool:
- Press the letter "C" on your keyboard to jump to the Crop Tool at any time.
- Hold down the Shift Key to constrain the proportions and making it a perfect square.
- If you decide you don't want to crop an image after selecting an area with the crop tool, simply press Escape or the
 button (Since I don't know it's name, you get a picture of the button, lol!)
What the heck is a slice tool for?! Well.... to make it simple... you can have one project open, and slice it into sections, and save each section.
Bear with me... think pizza. Slice it and each is it's own piece, and put them all back together, and you have a circle. Now think projects or web usage... linking to different parts of the web. My example for the slice tool is a siggy! Forum siggies have gotten really popular lately, and I threw this one together to show off this tool! (Just a tip, create your siggie in the size allowed for your scrapping home, this way you won't have to re-size different pieces after creation!)
Here is a basic siggy, now I will show you how to add slices so I can direct people to my blog, or my gallery:
Now, if you click and choose the Slice Tool, you will make a square around your image. Similar to The Crop Tool, but there are no grids, and the box itself, is made up of dots. Once you have your square, the software will set up what slices there are. This can be changed.
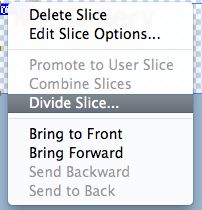
Here, you can see (I tried to zoom a little) that my bottom slice is covering both My Blog and My Gallery. I can right click on this slice, and choose Divide Slice, and then make it into two separate slices.


There are options when creating your slices... Re-naming them, providing a url, Message, and more. Here is a picture of the options menu within a slice, before I added my url's.
OK! Once you have all your slices and you are done cutting it all up into pieces,adding your information, you will Save for Web. So, click Save for Web, and make sure you use the following options:
Make sure your options are the same as mine. They are: JPEG; Maximum; Optimized Checked; Quality 100; Blur:0; Matte:Blank.
For this way of linking, you can save images only, BUT if you are linking and doing the whole code and table thing, remember to Save with HTML and Images.
If you don't follow the above choices, I don't know if the rest will work, sorry! This is what your slices will look like when you save them... I have a bunch of extra ones, but I just delete the ones that I don't have any image or url in.
Now, I upload to Photobucket, and then add the images to my forum signature area, and then link the 2 images. One links to my blog, and one links to my gallery. Quick and easy sliced signatures linked to the web! I hope this was something new, and if you do it another way, please share!!!!
Have a great rest of your weekend!
Jenn (jk703)


1 comments:
Just a quick note to let you know that a link to this post will be placed on CraftCrave today [21 Nov 01:00am GMT]. Thanks, Maria
Post a Comment