Hi there! Kiki here with a quick tutorial for Photoshop CS versions on how I do the shadowing of acrylic elements. It's a tricky business because what often happens in using a shadow style is that the whole element is used as the basis for the shape of the shadow and the element then looks too dark. My technique removes the heavy shadowing under most of the element, which makes sense since light would probably shine through the element onto the page. There would be a bit of a coloration difference underneath and this tutorial will show you how to get that area lighter, while providing a shadow that is heavier around the edges, which is more realistic. So are you ready? This tutorial was done with Photoshop CS3.
Step one:
Place your element onto your page where you would like it. You'll see below that I've selected an acrylic element and paper from Jennifer's I've got a Feeling kit.

Step two:
You'll see that if I apply a low shadow to the element, the element itself looks darker, and we don't really want that since light would shine through the talk bubble onto the page. It should be a little darker than the page, but not by much. So how do we correct this?
In your layers palette, right click on the layer effects, where you see it marked Indicate layer effect. Then select Create Layer.
 This is the result. The shadow is now its own layer underneath the element. But the result is still the same, too dark.
 Step 3: This is where the fun begins. Okay from this starting point you'll notice that your element is the active layer on your layer palette.
 Make the shadow layer the active layer in your layer palette by selecting that layer.
Now comes the tricky part. While your active layer is still the shadow, Control Click on the thumbnail of your element on the layer above your shadow. Doing this will give you the marching ants around the element but your active layer remains the shadow.
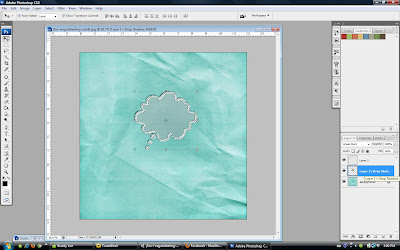
Step four:
Now from your menu bar, choose Select. Then select Inverse. This will select everything on the page except your element area. Notice that the marching ants now go around your page and the areas of your element.

Step 5: Now we have to contract that area so that we don't erase all of our shadow when we hit delete. So to do that, with the marching ants still active, go back to the Select menu, and this time select Modify, and then Contract. I use about 30 pixels in size.
 Now see how the marching ants change their selection area. Now you are still on the shadow layer as your active layer with that area select, and hit your delete button on your keyboard. Great, we've removed some of the shadowing, but it's still a bit heavy underneath.
So let's go ahead and change the opacity of the shadow to about 50% or whatever you are comfortable with. Here's my final result:

You'll notice that it is slightly darker than the element by itself, but not overly so, and we have shadowing around the edges to give it some depth.
I hope you found this tutorial interesting and helpful!
Read more...