Sunday, July 11, 2010

Sunday Spotlight - "My Birthday Boy"

Hi, it's Kate here to spotlight another of Jennifer's great kits. I had a hard time deciding which one to spotlight since they're all fantastic. I finally decided upon "My Birthday Boy" because I have two boys and finding a birthday kit that works well for older boys isn't easy. This kit is versatile and works well for younger and older boys... and not just for birthdays, either.


Take a look at some of the layouts and a hybrid project done with this kit.

Birthday Fun by SmallMoments

Happy Forty? by Leila

Birthday Boy by Ishook78

and finally a hybrid Birthday Card by Ramona the Pest

Looking at all the hybrid goodies in the gallery is making me really want to try hybrid. I guess that means I'd better go clean off my craft table!

If you've created anything with Jennifer's Kit "My Birthday Boy" we'd love to see it - link us up in the comments!

Read more...

Saturday, July 10, 2010

Saturday School - Pet "Green Eye" removal

Hi everyone. Kiki here with my first tutorial on Saturday with Jennifer's team. I'm going to show you a technique I use all the time since I take a lot of pictures of my pets. So we all know that Photoshop has an automatic red eye removal, but what can you do for that dreaded "glowing green eye" that you get from taking pictures of pets? Here's a solution that you may find works for you. I use it pretty regularly and am so glad that I learned how to take care of this because rarely do I get that great shot without the green eye. Are you ready?

Okay, so step one is to open up your photo in Photoshop and get your Layers Palette ready because we'll be working with that.

I've opened up a picture of my dog, Nanouk. This is straight out of the camera. Now you see what I'm talking about with the dreaded green eye.


Now what we are going to do to get rid of the green eye is cover it with a layer of black with a round brush at 0% hardness right over the green part of the eye. To do this, we'll create a new layer first and place it above the original picture.

For this next step I zoom in close so that I can make sure that I'm only covering the green and not his beautiful brown eyes.

Now, with your brush, and making sure that you are on the new layer, brush or click your round brush until you see no more green underneath. You'll notice that the more you click, the wider the brush extends and it blends pretty well. You can do both eyes on one layer.


Now this looks very odd because the colour is flat and too dark. There's no shine to his eyes. His natural eyes would normally have a glint of white light in them from the flash or surrounding light. So let's add this by creating another layer above the black one and we'll use a soft white brush this time to imitate the catch light in his eyes. The best way I find to do this is to make the black layer invisible for a moment so that I can see where the original catch light was in the first place. Then with my new layer for the white brush selected, I brush with a small white brush right over the original light. You'll obviously need to use a very small brush for this so that it only covers the original glint of light in his eyes.


So now I've got the white brushed over the catch lights and now I can make my black brush layer beneath it visible again for the final result.


I hope you all found this useful for your pet photos. This has saved more than a few of mine with just a few easy steps. It's a little trickier with cats because of their almond shaped eyes, but really all you need to do is make sure that you've brushed over all the green area with a soft brush so that it is covered with the black. Then follow the same steps to recreate the catch lights in the eyes.

I hope you enjoyed this tutorial. If you did, I'd love to see your before and after pics, so leave me a comment with links so that I can check them out. Thanks everyone and have a great weekend!

Read more...

Friday, July 9, 2010

Friday Freebie : Altered Frame

Friday again? Just as well, are you hanging out for a quality digi freebie? Well, you've come to the right place. It's SkrappyKathy here (Katharyn Brine) and today we have for you a PNG frame altered with some goodies from Jennifer's Won't You Tell Me Your Name kit, released this week @ The Digi Chick.


Download here.

I just love the paper figures. And the alpha prints out really well too. I know this because I got 80+ layouts in the mail today (Yip-Yip-Yippee!!) And no, they weren't all made with this kit, silly ...

It's my favourite part of scrapping - seeing the actual, tangible page in my hot little hands. The kids love them too. Tonight I did a show 'n tell presentation to them as they all had a bath. They were begging for me to read out more pages "about me! about me!" Well, as the night progressed, the layouts were sorted into 6 piles according to album and before I could insert them all, my 2-year-old DD spilt green cordial ALL OVER THEM. Like, I'm talking a whole cup full. What's worse, is that I didn't discover the scene of the crime until I came back to it after dinner and bedtime stories. By then, a lot of my pages had a bespeckled green tinge to them. Oh dear. The prints are advertised as "archival" and "waterproof", so I guess we'll see.... They were soaking for too long for a lot of them to escape real damage. But I guess I'll have to learn to live with it. They are hanging up drying out at the moment.

Anyway, enough commiserating and back to this freebie - this is the whole kit it is made from;


Don't forget to post your layouts in the gallery - we'd love to check them out.
See you next time!

Read more...

Thursday, July 8, 2010

Guest Designer Template Challenge Chat at Log Your Memory


Plan to join us this evening at 7 p.m. Mountain/9 p.m. Eastern for our Template Challenge Chat with July Guest Designer Jennifer Fox of Jennifer Fox Designs. The chat takes place in the Log Your Memory Chat Room.

A free layered template, a fun scrapbooking challenge, a reward for posting your layout before the deadline, and the chance to hang out with friends & get to know Jen.

Everyone welcome!!

Read more...

Wednesday, July 7, 2010

Shaped Card

Hi everyone!  Happy Wednesday to you all!  Jackie here enjoying some chocolate pudding as today (July 7th) is Chocolate Day.  Did you know that?  Go grab a candy bar, some chocolate milk, or if you're like me and on a diet, the chocolate pudding!  Want another way to celebrate Chocolate Day?  Create something fun with some of Jennifer's goodies, of course!


I'm going to show you a fairly detailed tutorial today.  If you already know how to do most of this, then feel free to proceed on with other steps.  If you want to learn step by step how I make this, then this is the tutorial for you!  Beginners with hybrid and PSE or other photo-editing software look no further!

I'm going to show you how to make a fun shaped card with Jennifer's collaboration with Shawna Clingerman - Sweetiekins.


First off, I opened up the elements and papers I wanted to use in PSE 7.  I knew that I wanted my card to be 5x7 in size so I used the crop tool and changed the width and height.  
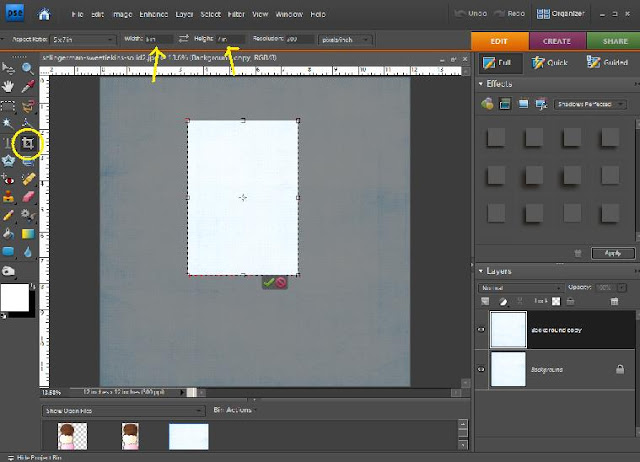

 Then I created a 5x7 work area (the size my finished card will be).  

Next, I placed the paper and element on the 5x7 work area and laid it how I wanted it to be.

Then I decided to add a greeting that played along with the ice cream theme.  Clever, huh?
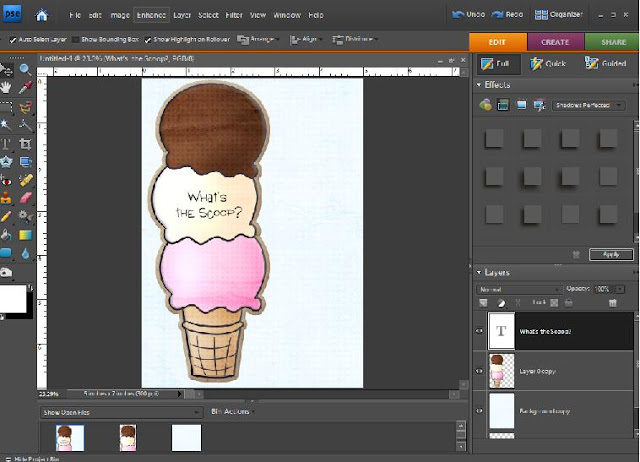

The next step was to create the 8.5x11 work area that would be printed off.  

I dragged all the items over to the new workspace and then was ready to print.

I then gathered my supplies.

I cut out the paper and the ice cream cone and laid it out on the card base and tried to figure out where I liked it best.  


Then I added the adhesive to the back (left side when it's right-side up) side of the paper the ice cream cone would sit on and placed it on the card base.


Then I adhered the ice cream cone and cut along the right edge to shape the card.  The next thing I did was add the glitter.  I used Stickles - it's a very easy way to add some shimmer things!


And voila - the finished product!  A card that's not your typical card - it's got some shape to the front of it - but very easy to make.  

Read more...
Related Posts with Thumbnails

Disclaimer

As a creative team member for several digital scrapbook designers, I have received their products for free in return for creating and posting projects (digital layouts, hybrids projects, etc). Many of the layouts you see here were done in conjunction with requirements for these creative teams. Please be advised that the products used were indeed received for free.
The Daily Scrapper - Topsites Best Scrapbooking Sites, Digital Scrapbooking, Scrapbook Supplies, Reviews, Awards
List of the Best Digital Scrapbooking Websites by Scrapbook MAX!SCRAPBOOKING TOP 500 The Daily Scrapper - Topsites Free Digital Scrapbooking

  © Blogger templates Newspaper III by Ourblogtemplates.com 2008

Back to TOP